목차
- Frequency Counters
- Multiple Pointers
- Sliding Window
- Divide and conquer
- Recursion
- Linear Search
- Naive String Search
- Binary Search
- Bubble Sort
- Selection Sort
- Insertion Sort
- Merge Sort
- Quick Sort
- Single Linked List
- Dobule Linked List
- Stack
- Queue
- Binary Search Tree
- Breadth First Search
- Depth First Search
- Binary Heap
- Priority Queue
- Hash Table
- graph
- Dijkstra
- Dynamic Programming
Frequency Counters
Frequency Counters는 프로그래밍에서 특정 요소의 발생 빈도를 효율적으로 계산하는 알고리즘 기법입니다. 주로 배열, 문자열 또는 다른 자료 구조 내에서 요소의 빈도를 세어야 할 때 사용됩니다. 이 방법은 일반적으로 시간 복잡도를 줄이고 코드를 보다 효율적으로 만들기 위해 사용됩니다.
기본 개념
Frequency Counter의 기본 개념은 다음과 같습니다:
- 자료 구조 선택: 주로 해시맵(또는 객체)을 사용하여 각 요소의 발생 빈도를 저장합니다.
- 반복문 사용: 데이터를 한 번 순회하면서 각 요소의 빈도를 해시맵에 기록합니다.
- 결과 분석: 필요에 따라 빈도 데이터를 사용하여 문제를 해결합니다.
시간 복잡도
이 자바스크립트 구현은 각 배열 또는 문자열을 한 번만 순회하기 때문에 시간 복잡도는 O(n)입니다. 이는 효율적인 해결책을 제공합니다.
활용 예시
Frequency Counter 알고리즘은 자바스크립트에서 다음과 같은 다양한 문제에 유용하게 사용될 수 있습니다:
- 애너그램(Anagram) 문제 해결
- 배열 내 중복 요소 찾기
- 데이터 집합에서 가장 많이/적게 발생한 요소 찾기
- 주어진 조건에 맞는 부분 배열 찾기
function charCount(str) {
  // 소문자로 변환하기
  // 문자를 하나씩 떼서 배열 안에 넣기
  let arr = []
  let result = {}

  arr = str.toLowerCase().split('')

  // 배열을 순회하면서 문자의 개수를 세기
  for (let i = 0; i < arr.length; i++) {
    // 0-9, a-z 사이의 문자인지 정규 표현식을 통해 확인하기

    if (!/[0-9a-z]/.test(arr[i])) continue

    if (result[arr[i]] > 0) {
      result[arr[i]]++
    } else {
      result[arr[i]] = 1
    }
  }

  return result
}

console.log(charCount('Hello')) // { h: 1, e: 1, l: 2, o: 1 }
console.log(charCount('Your Pin is 1234 !'))

/*
{
  '1': 1,
  '2': 1,
  '3': 1,
  '4': 1,
  y: 1,
  o: 1,
  u: 1,
  r: 1,
  p: 1,
  i: 2,
  n: 1,
  s: 1
}
*/

/**
 * 사용한 프로토타입 메서드
 *
 * - String.prototype.toLowerCase: 문자열을 소문자로 변환한다.
 * - String.prototype.split: 문자열을 배열로 변환한다.
 * - RegExp.prototype.test: 문자열이 정규 표현식과 일치하는지 확인한다.
 * - if 문, continue: 반복문을 중단하고 다음 반복으로 넘어간다.
*/배열로 비교
- for 문 내부에서 indexOf로 검색하기 때문에 O(n^2)
function same(arr1, arr2) {
  if (arr1.length !== arr2.length) return false

  for (let i = 0; i < arr1.length; i++) {
    let correctIndex = arr2.indexOf(arr1[i] ** 2)
    if (correctIndex === -1) return false

    // console.log(arr2);
    arr2.splice(correctIndex, 1)
  }
  return true
}

console.log(same([1, 2, 3], [4, 1, 9])) // true
console.log(same([1, 2, 3], [1, 9])) // false
console.log(same([1, 2, 1], [4, 4, 1])) // false

/**
 * 사용한 프로토타입 메서드
 * - Array.prototype.indexOf: 배열에서 특정 요소를 찾아 인덱스를 반환한다. 없으면 -1을 반환한다.
 * - Array.prototype.splice: 배열에서 특정 요소를 제거한다.
*/객체로 비교
- for 문 내부를 순회하면서 객체 내부를 index를 기반으로 access 하기 때문에 O(n)
function same2(arr1, arr2) {
  if (arr1.length !== arr2.length) return false

  let frequencyCounter1 = {}
  let frequencyCounter2 = {}

  for (let val of arr1) {
    frequencyCounter1[val] = (frequencyCounter1[val] || 0) + 1
  }

  for (let val of arr2) {
    frequencyCounter2[val] = (frequencyCounter2[val] || 0) + 1
  }

  console.log(frequencyCounter1)
  console.log(frequencyCounter2)

  for (let key in frequencyCounter1) {
    // { key: value } 중 key 체크
    if (!(key ** 2 in frequencyCounter2)) return false

    // { key: value } 중 value 체크
    if (frequencyCounter2[key ** 2] !== frequencyCounter1[key]) return false
  }

  return true
}

console.log(same2([1, 2, 3], [4, 1, 9])) // true
console.log(same2([1, 2, 3, 3], [4, 9, 1, 9])) // true
console.log(same2([1, 2, 3], [1, 9])) // false

/*
{ '1': 1, '2': 1, '3': 1 }
{ '1': 1, '4': 1, '9': 1 }
true

{ '1': 1, '2': 1, '3': 2 }
{ '1': 1, '4': 1, '9': 2 }
true

false
*/

/**
 * 사용한 프로토타입 메서드
 * - for...of 문: 배열의 요소를 순회한다.
 * - for...in 문: 객체의 키를 순회한다.
*/Anagram
// time complexity: O(n)

function validAnagram(str1, str2) {
  let strCounter1 = {}
  let strCounter2 = {}

  for (let char of str1) {
    strCounter1[char] = (strCounter1[char] || 0) + 1
  }

  for (let char of str2) {
    strCounter2[char] = (strCounter2[char] || 0) + 1
  }

  for (let key in strCounter1) {
    if (!(key in strCounter2)) return false

    if (strCounter2[key] !== strCounter1[key]) return false
  }

  return true
}

console.log(validAnagram('', ''))
console.log(validAnagram('aaz', 'zza'))
console.log(validAnagram('anagram', 'nagaram'))
console.log(validAnagram('rat', 'car'))
console.log(validAnagram('awesome', 'awesom'))
console.log(validAnagram('amanaplanacanalpanama', 'acanalmanplanpamana'))
console.log(validAnagram('qwerty', 'qeywrt'))
console.log(validAnagram('texttwisttime', 'timetwisttext'))

/**
 * validAnagram('', '') // true
 * validAnagram('aaz', 'zza') // false
 * validAnagram('anagram', 'nagaram') // true
 * validAnagram("rat","car") // false) // false
 * validAnagram('awesome', 'awesom') // false
 * validAnagram('amanaplanacanalpanama', 'acanalmanplanpamana') // false
 * validAnagram('qwerty', 'qeywrt') // true
 * validAnagram('texttwisttime', 'timetwisttext') // true
*/Multiple Pointers
Multiple Pointers의 기본 개념은 다음과 같습니다:
- 포인터 설정: 배열이나 문자열의 시작과 끝, 또는 특정 조건에 따라 포인터를 설정합니다.
- 포인터 이동: 특정 조건을 만족할 때까지 포인터를 이동합니다.
- 조건 만족 확인: 포인터가 특정 조건을 만족하는지 확인하여 문제를 해결합니다.
시간 복잡도
Multiple Pointers를 사용하는 알고리즘의 시간 복잡도는 일반적으로 O(n)입니다. 이는 배열이나 문자열을 한 번만 순회하면서 문제를 해결하기 때문입니다.
활용 예시
Multiple Pointers 기법은 다음과 같은 다양한 문제에서 유용하게 사용됩니다:
- 두 개의 포인터를 사용하여 배열 내 특정 조건을 만족하는 요소 찾기
- 중복 요소 제거
- 문자열 내 특정 패턴 찾기
- 정렬된 배열에서 특정 합을 가지는 쌍 찾기
이중 for문 사용
// time complexity o(n^2)

function sumZero(arr) {
  for (let i = 0; i < arr.length; i++) {
    for (let j = i + 1; j < arr.length; j++) {
      if (arr[i] + arr[j] === 0) {
        return [arr[i], arr[j]]
      }
    }
  }
  return undefined
}

console.log(sumZero([-5, -2, -1, 0, 1, 2, 3]))
console.log(sumZero([-3, -2, -1, 0, 1, 2, 3]))
console.log(sumZero([-2, 0, 1, 3]))
console.log(sumZero([1, 2, 3]))

// sumZero([-3,-2,-1,0,1,2,3]) >> [-3,3]
// sumZero([-2,0,1,3]) >> undefined
// sumZero([1,2,3]) >> undefinedWhile 문 사용, 단일 for문 사용 ✔
// time complexity o(n)

function sumZero(arr) {
  let left = 0
  let right = arr.length - 1

  while (left < right) {
    let sum = arr[left] + arr[right]
    if (sum === 0) {
      return [arr[left], arr[right]]
    } else if (sum > 0) {
      right--
    } else {
      left++
    }
  }
  return undefined
}

console.log(sumZero([-5, -2, -1, 0, 1, 2, 3]))
console.log(sumZero([-3, -2, -1, 0, 1, 2, 3]))
console.log(sumZero([-2, 0, 1, 3]))
console.log(sumZero([1, 2, 3]))

// sumZero([-3,-2,-1,0,1,2,3]) >> [-3,3]
// sumZero([-2,0,1,3]) >> undefined
// sumZero([1,2,3]) >> undefined두 개의 포인터를 사용하여 배열 내 특정 조건을 만족하는 요소 찾기
// 정렬된 배열을 받아들이고 배열의 고유 값을 세는 countUniqueValues라는 함수를 구현합니다. 배열에 음수가 있을 수 있지만 항상 정렬됩니다.

function countUniqueValues(arr) {
  let left = 0
  let right = 1

  if (arr.length === 0) return 0 // 빈 배열인 경우 0 반환

  while (right < arr.length) {
    if (arr[left] !== arr[right]) {
      left++
      arr[left] = arr[right] // 중복되지 않는 값을 왼쪽으로 옮김
    }
    right++
  }

  return left + 1 // left 인덱스는 0부터 시작하므로 1을 더해 유일한 값의 개수를 반환
}

console.log(countUniqueValues([1, 1, 1, 1, 1, 2])) // 2
console.log(countUniqueValues([1, 2, 3, 4, 4, 4, 7, 7, 12, 12, 13])) // 7
console.log(countUniqueValues([])) // 0
console.log(countUniqueValues([-2, -1, -1, 0, 1])) // 4 // 기본 세팅 >> left = 0, right = 1
i
[1, 2, 3, 4, 4, 4, 7, 7, 12, 12, 13]
jSliding Window
Sliding Window는 프로그래밍에서 배열이나 문자열과 같은 연속된 데이터 구조 내에서 부분 집합의 합, 평균, 최대값 또는 최소값 등을 효율적으로 계산하기 위해 사용하는 알고리즘 기법입니다. 이 기법은 고정된 크기나 가변 크기의 윈도우를 사용하여 문제를 해결합니다.
기본 개념
Sliding Window의 기본 개념은 다음과 같습니다:
- 윈도우 설정: 초기 윈도우 크기나 시작점을 설정합니다.
- 윈도우 이동: 데이터를 한 번에 하나씩 이동하면서 윈도우 내 값을 갱신합니다.
- 결과 갱신: 윈도우 내 값을 기준으로 필요한 결과를 갱신합니다.
예제
예제 1: 고정된 크기의 윈도우를 사용한 최대 합 찾기
다음은 고정된 크기의 윈도우를 사용하여 배열 내 연속된 요소들의 최대 합을 찾는 예제입니다.
function maxSubarraySum(arr, num) {
  if (arr.length < num) return null

  let maxSum = 0
  let tempSum = 0

  for (let i = 0; i < num; i++) {
    maxSum += arr[i]
  }
  tempSum = maxSum

  for (let i = num; i < arr.length; i++) {
    tempSum = tempSum - arr[i - num] + arr[i]
    maxSum = Math.max(maxSum, tempSum)
  }

  return maxSum
}

console.log(maxSubarraySum([1, 2, 5, 2, 8, 1, 5], 2)) // 10시간 복잡도
Sliding Window를 사용하는 알고리즘의 시간 복잡도는 일반적으로 O(n)입니다. 이는 데이터를 한 번만 순회하면서 문제를 해결하기 때문입니다.
활용 예시
Sliding Window 기법은 다음과 같은 다양한 문제에서 유용하게 사용됩니다:
- 고정된 크기의 윈도우 내 최대/최소 합 또는 평균 계산
- 가변 크기의 윈도우를 사용하여 특정 조건을 만족하는 최소/최대 길이 부분 배열 찾기
- 문자열 내 특정 패턴 찾기
- 배열 내 연속된 부분 배열의 합 또는 곱 계산
이 기법은 특히 배열이나 문자열과 같은 연속된 데이터 구조에서 효율적으로 부분 집합을 분석하고 처리하는 데 매우 유용합니다.
Divide and Conquer
Divide and Conquer의 기본 개념은 다음과 같습니다:
- 분할(Divide): 해결해야 할 문제를 동일한 유형의 더 작은 부분 문제로 나눕니다.
- 정복(Conquer): 각 부분 문제를 재귀적으로 해결합니다. 부분 문제가 충분히 작으면 직접 해결합니다.
- 결합(Combine): 부분 문제의 해를 합쳐서 원래 문제의 해를 얻습니다.
예제
예제 1: 병합 정렬 (Merge Sort)
병합 정렬은 Divide and Conquer를 사용하는 대표적인 정렬 알고리즘입니다. 배열을 반으로 나눈 후 각각을 정렬하고, 정렬된 부분 배열을 합칩니다.
function merge(arr1, arr2) {
  let idx1 = 0
  let idx2 = 0
  let result = []

  while (idx1 < arr1.length && idx2 < arr2.length) {
    if (arr1[idx1] < arr2[idx2]) {
      result.push(arr1[idx1])
      idx1++
    } else {
      result.push(arr2[idx2])
      idx2++
    }
  }

  // Remaining elements from arr1
  while (idx1 < arr1.length) {
    result.push(arr1[idx1])
    idx1++
  }

  // Remaining elements from arr2
  while (idx2 < arr2.length) {
    result.push(arr2[idx2])
    idx2++
  }

  return result
}

function mergeSort(arr) {
  if (arr.length <= 1) return arr

  let mid = Math.floor(arr.length / 2)
  let left = mergeSort(arr.slice(0, mid))
  let right = mergeSort(arr.slice(mid))

  return merge(left, right)
}

console.log(mergeSort([8, 3, 5, 4, 7, 6, 1, 2]))예제 2: 이진 탐색 (Binary Search)
이진 탐색은 정렬된 배열에서 특정 값을 찾는 효율적인 알고리즘입니다. 배열을 반으로 나누어 찾고자 하는 값이 어느 쪽에 있는지 확인한 후, 해당 절반에서 다시 탐색을 반복합니다.
function binarySearch(arr, target) {
  var start = 0
  var end = arr.length - 1
  var middle = Math.floor((start + end) / 2)

  while (arr[middle] !== target && start <= end) {
    if (target < arr[middle]) {
      end = middle - 1
    } else {
      start = middle + 1
    }
    middle = Math.floor((start + end) / 2)
  }
  if (arr[middle] === target) {
    return middle
  }
  return -1
}

let arr = [1, 2, 3, 4, 5, 6, 7, 8, 9, 10]
console.log(binarySearch(arr, 7)) // 6
console.log(binarySearch(arr, 11)) // -1시간 복잡도
Divide and Conquer를 사용하는 알고리즘의 시간 복잡도는 문제의 종류에 따라 다릅니다. 예를 들어:
- 병합 정렬: O(n log n)
- 이진 탐색: O(log n)
활용 예시
Divide and Conquer 기법은 다음과 같은 다양한 문제에서 유용하게 사용됩니다:
- 정렬 알고리즘 (예: 병합 정렬, 퀵 정렬)
- 검색 알고리즘 (예: 이진 탐색)
- 행렬 곱셈 (Strassen 알고리즘)
- 큰 수의 곱셈 (Karatsuba 알고리즘)
- 최근접 점 문제
이 기법은 복잡한 문제를 더 작은 문제로 분할하여 해결하기 때문에 매우 효율적이며, 많은 알고리즘에서 핵심적인 역할을 합니다.
Recursion
재귀(Recursion)는 함수가 자기 자신을 호출하여 문제를 해결하는 기법입니다. 재귀는 문제를 작은 부분 문제로 나누어 해결할 때 특히 유용하며, Divide and Conquer와 같은 알고리즘 기법과 자주 결합됩니다. 재귀를 사용하려면 기본 조건(base case)과 재귀 조건(recursive case)을 정의해야 합니다.
기본 개념
- 기본 조건 (Base Case): 재귀 호출을 멈추는 조건입니다. 더 이상 문제를 쪼갤 수 없을 때 기본 조건을 사용하여 결과를 반환합니다.
- 재귀 조건 (Recursive Case): 함수가 자기 자신을 호출하는 부분입니다. 문제를 더 작은 부분으로 쪼개고, 그 부분을 해결하기 위해 다시 함수를 호출합니다.
예제
예제 1: 팩토리얼 계산
팩토리얼은 1부터 n까지의 정수를 모두 곱한 값입니다. 재귀를 사용하여 팩토리얼을 계산할 수 있습니다.
function factorial(n) {
  if (n === 0) return 1 // 기본 조건
  return n * factorial(n - 1) // 재귀 조건
}

console.log(factorial(5)) // 120예제 2: 피보나치 수열
피보나치 수열의 각 항은 앞의 두 항의 합입니다. 재귀를 사용하여 피보나치 수를 계산할 수 있습니다.
function fibonacci(n) {
  if (n <= 1) return n // 기본 조건
  return fibonacci(n - 1) + fibonacci(n - 2) // 재귀 조건
}

console.log(fibonacci(7)) // 13예제 3: 배열의 합 계산
재귀를 사용하여 배열의 합을 계산하는 예제입니다.
function sumArray(arr) {
  if (arr.length === 0) return 0 // 기본 조건
  return arr[0] + sumArray(arr.slice(1)) // 재귀 조건
}

let arr = [1, 2, 3, 4, 5]
console.log(sumArray(arr)) // 15예제 4: 제곱근 만들기, helper 함수 사용
- 자바스크립트의 Math.prototype.pow()를 본따 함수를 선언합니다
- helper 함수는 재귀적이지 않은 외부 함수가 재귀적인 내부 함수를 호출하는 패턴입니다.
function power(number, cnt) {
  let result = 1
  if (cnt === 0) return 1

  function helper(number, cnt) {
    if (cnt === 0) return

    result *= number
    cnt--

    helper(number, cnt)
  }
  helper(number, cnt)

  return result
}

power(2, 0) // 1
power(2, 2) // 4
power(2, 4) // 16예제 5: 숫자 배열을 받아 모든 숫자의 곱을 반환하는 함수 만들기, helper 함수 사용
function productOfArray(arr) {
  let result = 1
  if (arr.length === 0) return null

  function helper(arr) {
    if (arr.length === 0) return

    result *= arr[0]

    helper(arr.slice(1))
  }

  helper(arr)

  return result
}

productOfArray([1, 2, 3]) // 6
productOfArray([1, 2, 3, 10]) // 60시간 복잡도
재귀 함수의 시간 복잡도는 함수의 호출 횟수와 각 호출당 작업의 양에 따라 다릅니다. 예를 들어, 피보나치 수열의 재귀 구현은 중복 계산이 많아 시간 복잡도가 O(2^n)으로 매우 비효율적입니다. 반면, 메모이제이션(memoization)을 사용하면 효율적으로 개선할 수 있습니다.
주의점
- 기본 조건의 중요성: 기본 조건이 없으면 함수가 무한히 호출되어 스택 오버플로(stack overflow)가 발생합니다.
- 재귀 깊이 제한: 대부분의 프로그래밍 언어는 재귀 호출의 최대 깊이를 제한합니다. 깊이가 너무 깊으면 스택 오버플로가 발생할 수 있습니다.
- 메모이제이션: 중복 계산을 피하기 위해 메모이제이션을 사용하면 성능을 크게 향상시킬 수 있습니다.
활용 예시
재귀는 다음과 같은 다양한 문제에서 유용하게 사용됩니다:
- 트리 및 그래프 탐색 (예: DFS)
- 정렬 알고리즘 (예: 퀵 정렬, 병합 정렬)
- 조합론 문제 (예: 순열, 조합)
- 동적 계획법 문제에서 부분 문제 해결
재귀는 복잡한 문제를 단순화하고, 코드를 보다 직관적으로 작성하는 데 매우 유용한 도구입니다.
Linear Search
선형 검색(Linear Search)은 가장 간단한 검색 알고리즘 중 하나로, 배열이나 리스트와 같은 데이터 구조에서 특정 요소를 찾기 위해 처음부터 끝까지 순차적으로 요소를 하나씩 비교하는 방식입니다. 선형 검색은 구현이 매우 간단하지만, 효율성이 떨어지기 때문에 작은 데이터셋에서 주로 사용됩니다.
기본 개념
선형 검색의 기본 개념은 다음과 같습니다:
- 순차적으로 비교: 리스트의 첫 번째 요소부터 마지막 요소까지 순차적으로 비교합니다.
- 일치하는 요소 찾기: 검색하려는 요소와 일치하는 요소를 찾으면 해당 요소의 인덱스를 반환합니다.
- 일치하는 요소가 없는 경우: 리스트의 모든 요소를 비교한 후에도 검색하려는 요소를 찾지 못하면 -1을 반환합니다.
예제
다음은 자바스크립트로 구현한 선형 검색의 예제입니다.
function linearSearch(arr, target) {
  for (let i = 0; i < arr.length; i++) {
    if (arr[i] === target) {
      return i // 요소를 찾으면 인덱스를 반환
    }
  }
  return -1 // 요소를 찾지 못하면 -1 반환
}

let arr = [5, 3, 8, 4, 2]
console.log(linearSearch(arr, 8)) // 2
console.log(linearSearch(arr, 7)) // -1시간 복잡도
선형 검색의 시간 복잡도는 다음과 같습니다:
- 최악의 경우 시간 복잡도: O(n)
- 리스트의 모든 요소를 비교해야 하는 경우입니다.
- 평균 시간 복잡도: O(n)
- 최선의 경우 시간 복잡도: O(1)
- 검색하려는 요소가 리스트의 첫 번째 요소인 경우입니다.
특징
- 단순함: 선형 검색은 구현이 매우 간단합니다.
- 비교 기반 검색(Comparison Search): 요소들을 하나씩 비교하여 검색합니다.
- 정렬 여부와 무관: 리스트가 정렬되어 있지 않아도 검색이 가능합니다.
- 제자리 검색(In-place Search): 추가적인 메모리 공간을 사용하지 않습니다.
장점
- 간단하고 직관적: 구현이 쉽고 직관적입니다.
- 정렬 필요 없음: 리스트가 정렬되어 있지 않아도 사용할 수 있습니다.
- 작은 데이터셋에 유용: 작은 데이터셋에 대해서는 효율적입니다.
단점
- 비효율성: 큰 데이터셋에 대해서는 비효율적이며, 시간이 많이 걸릴 수 있습니다.
- 시간 복잡도: 시간 복잡도가 O(n)으로, 요소의 수가 많아질수록 검색 시간이 선형적으로 증가합니다.
결론
선형 검색은 간단하고 구현이 쉬운 검색 알고리즘으로, 작은 데이터셋이나 정렬되지 않은 리스트에 유용하게 사용할 수 있습니다. 그러나, 큰 데이터셋에 대해서는 효율성이 떨어지므로, 이진 검색(Binary Search)과 같은 더 효율적인 검색 알고리즘을 사용하는 것이 좋습니다. 이진 검색은 리스트가 정렬되어 있는 경우에 사용할 수 있으며, 시간 복잡도가 O(log n)으로 훨씬 효율적입니다.
Naive String Search
Naive String Search는 문자열 내에서 특정 패턴을 찾기 위한 단순하고 직관적인 검색 알고리즘입니다. 이 알고리즘은 텍스트의 각 위치에서 패턴이 일치하는지 확인하는 방식으로 동작합니다. 이 과정은 매우 직관적이지만, 비효율적일 수 있습니다. 특히 긴 텍스트와 패턴의 경우 더 효율적인 알고리즘을 사용하는 것이 좋습니다.
기본 개념
Naive String Search의 기본 개념은 다음과 같습니다:
- 텍스트의 각 위치에서 패턴 확인: 텍스트의 첫 번째 문자부터 시작하여, 패턴의 길이만큼의 문자가 패턴과 일치하는지 확인합니다.
- 일치 여부 판단: 일치하는 경우 해당 위치를 기록하고, 일치하지 않는 경우 다음 위치로 이동하여 다시 확인합니다.
- 반복: 텍스트의 끝까지 이 과정을 반복합니다.
예제
다음은 자바스크립트로 구현한 Naive String Search의 예제입니다.
function naiveStringSearch(longer, shorter) {
  let cnt = 0

  for (let i = 0; i < longer.length; i++) {
    for (let j = 0; j < shorter.length; j++) {
      if (shorter[j] !== longer[i + j]) break
      if (j === shorter.length - 1) cnt++
    }
  }

  return cnt
}

naiveStringSearch('omaomggfaomg', 'omg') // 1시간 복잡도
Naive String Search의 시간 복잡도는 다음과 같습니다:
- 최악의 경우 시간 복잡도: O(n * m)
- 여기서 n은 텍스트의 길이, m은 패턴의 길이입니다.
특징
- 단순함: 구현이 매우 간단하고 직관적입니다.
- 비교 기반 검색: 패턴의 각 문자와 텍스트의 각 위치를 비교합니다.
- 정렬 필요 없음: 텍스트가 정렬되어 있을 필요가 없습니다.
- 제자리 검색: 추가적인 메모리 공간을 거의 사용하지 않습니다.
장점
- 간단한 구현: 알고리즘이 매우 직관적이고 이해하기 쉽습니다.
- 보편적 사용: 텍스트가 정렬되어 있을 필요가 없어 다양한 경우에 사용할 수 있습니다.
단점
- 비효율성: 긴 텍스트와 패턴에 대해서는 매우 비효율적입니다.
- 시간 복잡도: 최악의 경우 시간 복잡도가 O(n * m)으로, 더 효율적인 알고리즘에 비해 느릴 수 있습니다.
개선된 알고리즘
긴 텍스트나 패턴을 다룰 때 더 효율적인 문자열 검색 알고리즘이 필요할 수 있습니다. 다음과 같은 알고리즘들이 있습니다:
- Knuth-Morris-Pratt (KMP) 알고리즘: 패턴 내에서의 부분 일치를 이용하여 검색 속도를 향상시킵니다.
- Boyer-Moore 알고리즘: 패턴을 뒤에서 앞으로 검색하여 불일치가 발생했을 때 더 큰 폭으로 검색 범위를 이동합니다.
- Rabin-Karp 알고리즘: 해시 함수를 사용하여 패턴과 텍스트의 서브스트링을 비교합니다.
결론
Naive String Search는 단순하고 구현이 쉬운 문자열 검색 알고리즘입니다. 짧은 텍스트와 패턴의 경우 사용하기에 적합하지만, 긴 텍스트와 패턴을 다룰 때는 더 효율적인 알고리즘을 사용하는 것이 좋습니다. 효율적인 문자열 검색을 위해 KMP, Boyer-Moore, Rabin-Karp와 같은 알고리즘을 공부하고 사용하는 것을 권장합니다.
Binary Search
이진 탐색(Binary Search)은 효율적인 검색 알고리즘으로, 정렬된 배열이나 리스트에서 특정 요소를 찾기 위해 사용됩니다. 이진 탐색은 매번 검색 범위를 반으로 줄이기 때문에 시간 복잡도가 O(log n)으로 매우 효율적입니다.
기본 개념
이진 탐색의 기본 개념은 다음과 같습니다:
- 중간 요소 선택: 검색 범위의 중간 요소를 선택합니다.
- 비교: 중간 요소와 검색하려는 요소를 비교합니다.
- 일치하는 경우: 요소를 찾으면 해당 요소의 인덱스를 반환합니다.
- 작은 경우: 검색하려는 요소가 중간 요소보다 작으면, 검색 범위를 중간 요소의 왼쪽 부분으로 줄입니다.
- 큰 경우: 검색하려는 요소가 중간 요소보다 크면, 검색 범위를 중간 요소의 오른쪽 부분으로 줄입니다.
- 반복: 검색 범위가 없을 때까지 1~2번 과정을 반복합니다.
- 찾지 못한 경우: 검색 범위가 없어지면, 요소가 리스트에 없다는 뜻이므로 -1을 반환합니다.
예제
다음은 자바스크립트로 구현한 이진 탐색의 예제입니다.
function binarySearch(arr, target) {
  var start = 0
  var end = arr.length - 1
  var middle = Math.floor((start + end) / 2)

  while (arr[middle] !== target && start <= end) {
    if (target < arr[middle]) {
      end = middle - 1
    } else {
      start = middle + 1
    }
    middle = Math.floor((start + end) / 2)
  }
  if (arr[middle] === target) {
    return middle
  }
  return -1
}

let arr = [1, 2, 3, 4, 5, 6, 7, 8, 9, 10]
console.log(binarySearch(arr, 7)) // 6
console.log(binarySearch(arr, 11)) // -1시간 복잡도
이진 탐색의 시간 복잡도는 다음과 같습니다:
- 최악의 경우 시간 복잡도: O(log n)
- 평균 시간 복잡도: O(log n)
- 최선의 경우 시간 복잡도: O(1)
- 검색하려는 요소가 중간 요소인 경우입니다.
특징
- 효율성: 시간 복잡도가 O(log n)으로 매우 효율적입니다.
- 정렬된 리스트 필요: 이진 탐색은 리스트가 정렬되어 있어야 사용할 수 있습니다.
- 비교 기반 검색(Comparison Search): 요소들을 비교하여 검색합니다.
장점
- 빠른 검색 속도: 시간 복잡도가 O(log n)으로, 요소의 수가 많아도 빠르게 검색할 수 있습니다.
- 제자리 검색(In-place Search): 추가적인 메모리 공간을 사용하지 않습니다.
단점
- 정렬 필요: 리스트가 정렬되어 있어야만 사용할 수 있습니다.
- 구현 복잡성: 선형 검색에 비해 구현이 조금 더 복잡할 수 있습니다.
재귀적 구현
이진 탐색은 반복문을 사용하는 방법 외에도 재귀적으로 구현할 수 있습니다. 다음은 재귀적 이진 탐색의 예제입니다.
function binarySearchRecursive(arr, target, left = 0, right = arr.length - 1) {
  if (left > right) {
    return -1 // 요소를 찾지 못하면 -1 반환
  }

  let mid = Math.floor((left + right) / 2)

  if (arr[mid] === target) {
    return mid // 요소를 찾으면 인덱스를 반환
  } else if (arr[mid] < target) {
    return binarySearchRecursive(arr, target, mid + 1, right) // 오른쪽 부분을 검색
  } else {
    return binarySearchRecursive(arr, target, left, mid - 1) // 왼쪽 부분을 검색
  }
}

let arr = [1, 2, 3, 4, 5, 6, 7, 8, 9, 10]
console.log(binarySearchRecursive(arr, 7)) // 6
console.log(binarySearchRecursive(arr, 11)) // -1결론
이진 탐색은 정렬된 리스트에서 매우 효율적으로 요소를 검색할 수 있는 알고리즘입니다. 시간 복잡도가 O(log n)으로, 큰 데이터셋에서도 빠르게 작동합니다. 리스트가 정렬되어 있는 경우에만 사용할 수 있다는 제한이 있지만, 정렬된 데이터를 다루는 경우 이진 탐색은 매우 유용한 도구입니다.
Bubble Sort
버블 정렬(Bubble Sort)은 간단한 정렬 알고리즘 중 하나로, 인접한 두 요소를 비교하여 필요에 따라 위치를 바꾸면서 리스트를 정렬하는 방식입니다. 버블 정렬의 이름은 가장 큰 요소가 반복적으로 리스트의 끝으로 "부풀어 오르는" 과정에서 유래되었습니다.
기본 개념
버블 정렬의 기본 개념은 다음과 같습니다:
- 비교 및 교환: 리스트의 처음부터 시작하여 인접한 두 요소를 비교합니다. 만약 첫 번째 요소가 두 번째 요소보다 크면 두 요소의 위치를 바꿉니다.
- 반복: 리스트 끝까지 이 과정을 반복합니다. 이 과정을 반복하면 가장 큰 요소가 리스트의 끝으로 이동합니다.
- 반복 감소: 리스트 끝에 가장 큰 요소가 고정되면 다음 반복에서는 마지막 요소를 제외한 나머지 요소를 비교합니다.
- 정렬 완료: 더 이상 교환이 필요하지 않을 때까지 이 과정을 반복합니다.
예제
다음은 자바스크립트로 구현한 버블 정렬의 예제입니다.
function bubbleSort(arr) {
  let swaps = true
  for (let i = arr.length; i > 0; i--) {
    for (let j = 0; j < i - 1; j++) {
      if (arr[j] > arr[j + 1]) {
        let temp = arr[j]
        arr[j] = arr[j + 1]
        arr[j + 1] = temp
        swaps = false
      }
    }
    if (swaps) break
  }
  return arr
}

console.log(bubbleSort([1, 6, 3, 10, 2, 15]))

// [ 1, 6, 3, 10, 2, 15 ]
// [ 1, 3, 6, 10, 2, 15 ]
// [ 1, 3, 6, 2, 10, 15 ]
// [ 1, 3, 2, 6, 10, 15 ]
// [ 1, 2, 3, 6, 10, 15 ]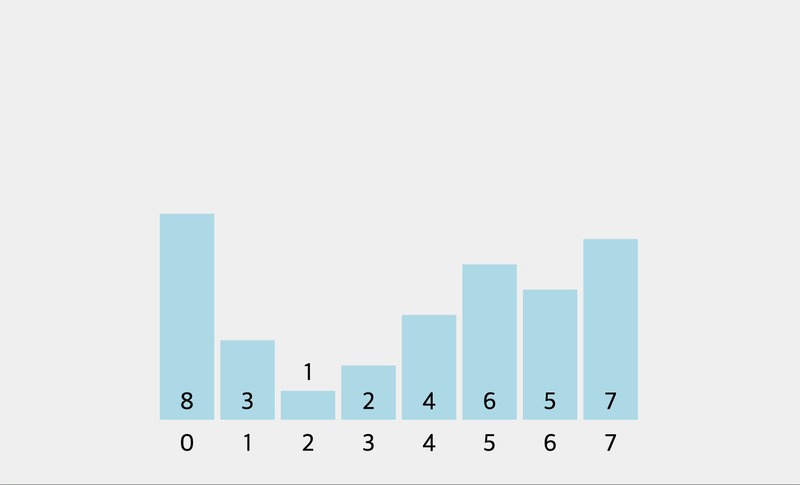
시간 복잡도
버블 정렬의 시간 복잡도는 다음과 같습니다:
- 최악의 경우 시간 복잡도: O(n^2)
- 리스트가 역순으로 정렬된 경우 모든 요소를 비교하고 교환해야 합니다.
- 평균 시간 복잡도: O(n^2)
- 최선의 경우 시간 복잡도: O(n)
- 리스트가 이미 정렬된 경우 한 번의 반복만으로 정렬이 완료됩니다.
특징
- 단순함: 버블 정렬은 구현이 매우 간단합니다.
- 안정성: 동일한 값의 요소들이 입력 순서를 유지합니다.
- 비효율성: 시간 복잡도가 O(n^2)로, 큰 리스트에 대해서는 비효율적입니다. 이는 실제로 사용되는 경우가 드문 이유입니다.
최적화
버블 정렬은 이미 정렬된 경우 비교를 최소화하기 위해 최적화할 수 있습니다. 만약 어떤 반복에서 교환이 발생하지 않으면 리스트가 이미 정렬된 것이므로 정렬을 종료할 수 있습니다.
function optimizedBubbleSort(arr) {
  let n = arr.length
  let swapped

  do {
    swapped = false
    for (let i = 0; i < n - 1; i++) {
      if (arr[i] > arr[i + 1]) {
        let temp = arr[i]
        arr[i] = arr[i + 1]
        arr[i + 1] = temp
        swapped = true
      }
    }
    n--
  } while (swapped)

  return arr
}

let arr = [3, 2, 1, 4, 5]
console.log(optimizedBubbleSort(arr)) // [1, 2, 3, 4, 5]이 최적화는 최선의 경우 시간 복잡도를 O(n)으로 줄여줍니다.
결론
버블 정렬은 이해하고 구현하기 쉬운 정렬 알고리즘으로 교육용으로 자주 사용됩니다. 하지만 시간 복잡도 측면에서 비효율적이기 때문에 실제로는 크기가 작은 배열을 제외하고는 잘 사용되지 않습니다. 대부분의 경우, 퀵 정렬(Quick Sort), 병합 정렬(Merge Sort), 힙 정렬(Heap Sort)과 같은 더 효율적인 정렬 알고리즘을 사용하는 것이 좋습니다.
Selection Sort
선택 정렬(Selection Sort)은 단순한 정렬 알고리즘 중 하나로, 리스트에서 가장 작은 요소를 찾아 맨 앞의 요소와 교환하는 과정을 반복하여 정렬하는 방식입니다. 선택 정렬은 이해하기 쉽고 구현이 간단하지만, 시간 복잡도가 O(n^2)으로 비효율적입니다.
기본 개념
선택 정렬의 기본 개념은 다음과 같습니다:
- 최소값 찾기: 리스트에서 현재 위치부터 끝까지 탐색하여 가장 작은 요소를 찾습니다.
- 교환: 가장 작은 요소를 현재 위치의 요소와 교환합니다.
- 반복: 리스트의 모든 위치에 대해 이 과정을 반복합니다.
예제
다음은 자바스크립트로 구현한 선택 정렬의 예제입니다.
function swap(arr, idx1, idx2) {
  let temp = arr[idx1]
  arr[idx1] = arr[idx2]
  arr[idx2] = temp
}

function selectionSort(arr) {
  for (let i = 0; i < arr.length; i++) {
    let tempIdx = i

    for (let j = i + 1; j < arr.length; j++) {
      if (arr[j] < arr[tempIdx]) {
        tempIdx = j
      }
    }

    if (i !== tempIdx) swap(arr, i, tempIdx)
  }
  return arr
}

console.log(selectionSort([0, 2, 34, 22, 10, 19, 17]))

// [ 0, 2, 10, 22, 34, 19, 17 ]
// [ 0, 2, 10, 17, 34, 19, 22 ]
// [ 0, 2, 10, 17, 19, 34, 22 ]
// [ 0, 2, 10, 17, 19, 22, 34 ]
// [ 0, 2, 10, 17, 19, 22, 34 ]
시간 복잡도
선택 정렬의 시간 복잡도는 다음과 같습니다:
- 최악의 경우 시간 복잡도: O(n^2)
- 모든 요소를 비교해야 하므로 반복문이 중첩되어 시간 복잡도가 O(n^2)입니다.
- 평균 시간 복잡도: O(n^2)
- 최선의 경우 시간 복잡도: O(n^2)
- 이미 정렬된 리스트에서도 모든 요소를 비교하므로 시간 복잡도는 여전히 O(n^2)입니다.
특징
- 단순함: 선택 정렬은 이해하고 구현하기 매우 쉽습니다.
- 제자리 정렬(In-place Sort): 별도의 추가 메모리를 거의 사용하지 않으며, 주어진 배열 내에서 정렬이 이루어집니다.
- 안정성: 선택 정렬은 안정적이지 않습니다. 동일한 값의 요소들이 입력 순서를 유지하지 않을 수 있습니다.
- 비효율성: 시간 복잡도가 O(n^2)으로, 큰 리스트에 대해서는 비효율적입니다. 따라서 실제로 사용되는 경우가 드뭅니다.
결론
선택 정렬은 교육 목적으로 많이 사용되는 단순한 정렬 알고리즘입니다. 이해하기 쉽고 구현이 간단하지만, 시간 복잡도 측면에서 비효율적이므로 실제로는 크기가 작은 배열을 제외하고는 잘 사용되지 않습니다. 대부분의 경우, 퀵 정렬(Quick Sort), 병합 정렬(Merge Sort), 힙 정렬(Heap Sort)과 같은 더 효율적인 정렬 알고리즘을 사용하는 것이 좋습니다.
Insertion Sort
삽입 정렬(Insertion Sort)은 간단하고 직관적인 정렬 알고리즘 중 하나로, 배열을 부분적으로 정렬된 상태로 유지하면서 새로운 요소를 올바른 위치에 삽입하는 방식입니다. 삽입 정렬은 작은 데이터 세트에 대해서는 효율적이고, 거의 정렬된 배열에 대해서도 효율적입니다.
기본 개념
삽입 정렬의 기본 개념은 다음과 같습니다:
- 부분 정렬 유지: 배열의 첫 번째 요소는 이미 정렬된 상태로 간주하고, 두 번째 요소부터 시작하여 배열을 부분적으로 정렬된 상태로 유지합니다.
- 삽입 위치 찾기: 현재 요소를 이미 정렬된 부분 배열과 비교하여 적절한 위치를 찾습니다.
- 삽입: 현재 요소를 올바른 위치에 삽입합니다.
- 반복: 배열의 모든 요소에 대해 이 과정을 반복합니다.
예제
다음은 자바스크립트로 구현한 삽입 정렬의 예제입니다.
function insertionSort(arr) {
  var currentVal

  for (var i = 1; i < arr.length; i++) {
    currentVal = arr[i]

    for (var j = i - 1; j >= 0 && arr[j] > currentVal; j--) {
      arr[j + 1] = arr[j]
    }
    arr[j + 1] = currentVal
  }
  return arr
}

console.log(insertionSort([2, 1, 9, 76, 4]))

// currentnValue: 1 ,  [ 1, 2, 9, 76, 4 ]
// currentnValue: 9 ,  [ 1, 2, 9, 76, 4 ]
// currentnValue: 76 , [ 1, 2, 9, 76, 4 ]
// currentnValue: 4 , [ 1, 2, 4, 9, 76 ]//
시간 복잡도
삽입 정렬의 시간 복잡도는 다음과 같습니다:
- 최악의 경우 시간 복잡도: O(n^2)
- 배열이 역순으로 정렬된 경우 모든 요소를 비교하고 이동해야 합니다.
- 평균 시간 복잡도: O(n^2)
- 최선의 경우 시간 복잡도: O(n)
- 배열이 이미 정렬된 경우 한 번의 비교만으로 정렬이 완료됩니다.
특징
- 단순함: 삽입 정렬은 이해하고 구현하기 매우 쉽습니다.
- 제자리 정렬(In-place Sort): 별도의 추가 메모리를 거의 사용하지 않으며, 주어진 배열 내에서 정렬이 이루어집니다.
- 안정성: 삽입 정렬은 안정적입니다. 동일한 값의 요소들이 입력 순서를 유지합니다.
- 효율성: 삽입 정렬은 작은 배열이나 거의 정렬된 배열에 대해서 매우 효율적입니다. 그러나, 큰 배열에 대해서는 비효율적입니다.
결론
삽입 정렬은 간단하고 직관적인 정렬 알고리즘으로, 이해하기 쉽고 구현이 간단합니다. 작은 데이터 세트나 거의 정렬된 배열에 대해서는 매우 효율적이며, 안정적인 정렬 알고리즘입니다. 그러나, 시간 복잡도가 O(n^2)이기 때문에 큰 배열에 대해서는 비효율적이며, 이 경우 퀵 정렬(Quick Sort), 병합 정렬(Merge Sort), 힙 정렬(Heap Sort)과 같은 더 효율적인 정렬 알고리즘을 사용하는 것이 좋습니다.
Merge Sort
병합 정렬(Merge Sort)은 Divide and Conquer 기법을 사용하는 효율적인 정렬 알고리즘입니다. 병합 정렬은 리스트를 반으로 나누어 각각을 재귀적으로 정렬하고, 정렬된 부분 리스트를 합쳐서 전체 리스트를 정렬합니다. 이 알고리즘은 안정적이고, 시간 복잡도가 O(n log n)으로 매우 효율적입니다.
기본 개념
병합 정렬의 기본 개념은 다음과 같습니다:
- 분할(Divide): 리스트를 두 개의 하위 리스트로 나눕니다.
- 정복(Conquer): 하위 리스트를 재귀적으로 병합 정렬합니다.
- 결합(Combine): 두 개의 정렬된 하위 리스트를 하나의 정렬된 리스트로 병합합니다.
예제
다음은 자바스크립트로 구현한 병합 정렬의 예제입니다.
function merge(arr1, arr2) {
  let idx1 = 0
  let idx2 = 0
  let result = []

  while (idx1 < arr1.length && idx2 < arr2.length) {
    if (arr1[idx1] < arr2[idx2]) {
      result.push(arr1[idx1])
      idx1++
    } else {
      result.push(arr2[idx2])
      idx2++
    }
  }

  // Remaining elements from arr1
  while (idx1 < arr1.length) {
    result.push(arr1[idx1])
    idx1++
  }

  // Remaining elements from arr2
  while (idx2 < arr2.length) {
    result.push(arr2[idx2])
    idx2++
  }

  return result
}

function mergeSort(arr) {
  if (arr.length <= 1) return arr

  let mid = Math.floor(arr.length / 2)
  let left = mergeSort(arr.slice(0, mid))
  let right = mergeSort(arr.slice(mid))

  return merge(left, right)
}

console.log(mergeSort([8, 3, 5, 4, 7, 6, 1, 2]))

// [ 8, 3, 5, 4, 7, 6, 1, 2 ]
// [ 8, 3, 5, 4 ] [ 7, 6, 1, 2 ]
// [ 8, 3 ] [ 5, 4 ] [ 7, 6 ] [ 1, 2 ]
// [ 8 ] [ 3 ] [ 5 ] [ 4 ] [ 7 ] [ 6 ] [ 1 ] [ 2 ]
// [ 3, 8 ] [ 4, 5 ] [ 6, 7 ] [ 1, 2 ]
// [ 3, 4, 5, 8 ] [ 1, 2, 6, 7 ]
// [ 1, 2, 3, 4, 5, 6, 7, 8 ]
시간 복잡도
병합 정렬의 시간 복잡도는 다음과 같습니다:
- 최악의 경우 시간 복잡도: O(n log n)
- 리스트를 계속해서 반으로 나누고, 각 단계에서 병합하는 데 O(n) 시간이 걸립니다.
- 평균 시간 복잡도: O(n log n)
- 최선의 경우 시간 복잡도: O(n log n)
특징
- 안정성: 병합 정렬은 안정적입니다. 동일한 값의 요소들이 입력 순서를 유지합니다.
- 제자리 정렬이 아님(Not In-place Sort): 병합 정렬은 추가적인 배열을 사용하여 병합 과정을 수행하기 때문에, 추가적인 메모리가 필요합니다.
- 분할 정복 기법(Divide and Conquer): 리스트를 분할하고, 각각을 정렬한 후 병합하여 전체 리스트를 정렬합니다.
장점
- 안정적인 정렬: 입력 데이터의 순서를 유지합니다.
- 예측 가능한 시간 복잡도: 최선, 평균, 최악의 경우 모두 O(n log n)의 시간 복잡도를 가집니다.
- 외부 정렬 가능: 큰 데이터를 디스크에서 정렬할 때 사용 가능합니다.
단점
- 추가 메모리 사용: 병합 정렬은 추가적인 배열을 사용하여 병합을 수행하므로, 메모리 사용량이 늘어납니다.
- 비교 기반 정렬: 데이터의 크기에 따라 비교 연산이 많이 필요할 수 있습니다.
결론
병합 정렬은 효율적이고 안정적인 정렬 알고리즘으로, 특히 큰 데이터 세트나 외부 정렬이 필요한 경우에 유용합니다. 그러나 추가 메모리 사용이 필요하다는 단점이 있으므로, 메모리 사용이 중요한 환경에서는 퀵 정렬(Quick Sort)과 같은 다른 정렬 알고리즘을 고려할 수 있습니다.
Quick Sort
퀵 정렬(Quick Sort)은 Divide and Conquer 기법을 사용하는 매우 효율적인 정렬 알고리즘입니다. 평균적으로 매우 빠른 시간 복잡도인 O(n log n)을 가지며, 제자리 정렬(In-place Sort) 알고리즘입니다. 퀵 정렬은 리스트에서 피벗(pivot) 요소를 선택하고, 이를 기준으로 리스트를 두 개의 하위 리스트로 나누는 과정을 반복하여 정렬합니다.
기본 개념
퀵 정렬의 기본 개념은 다음과 같습니다:
- 피벗 선택: 리스트에서 피벗 요소를 선택합니다.
- 분할: 피벗을 기준으로 리스트를 두 개의 하위 리스트로 분할합니다. 피벗보다 작은 요소들은 피벗의 왼쪽으로, 피벗보다 큰 요소들은 피벗의 오른쪽으로 이동합니다.
- 재귀 호출: 분할된 하위 리스트에 대해 퀵 정렬을 재귀적으로 호출합니다.
- 결합: 하위 리스트가 정렬되면 이들을 결합하여 전체 리스트를 정렬합니다.
예제
다음은 자바스크립트로 구현한 퀵 정렬의 예제입니다.
function swap(arr, idx1, idx2) {
  let temp = arr[idx1]
  arr[idx1] = arr[idx2]
  arr[idx2] = temp
}

function pivot(arr, start = 0, end = arr.length + 1) {
  var pivot = arr[start]
  var swapIdx = start

  for (var i = start + 1; i < arr.length; i++) {
    if (pivot > arr[i]) {
      swapIdx++
      swap(arr, swapIdx, i)
    }
  }
  swap(arr, start, swapIdx)
  return swapIdx
}

console.log(pivot([5, 2, 1, 8, 4, 7, 6, 3])) // 3

function quickSort(arr, left = 0, right = arr.length - 1) {
  if (left < right) {
    let pivotIndex = pivot(arr, left, right)

    // left
    quickSort(arr, left, pivotIndex - 1)
    // right
    quickSort(arr, pivotIndex + 1, right)
  }
  return arr
}
시간 복잡도
퀵 정렬의 시간 복잡도는 다음과 같습니다:
- 최악의 경우 시간 복잡도: O(n^2)
- 리스트가 이미 정렬된 경우나 피벗이 최솟값이나 최댓값으로 선택되는 경우입니다.
- 평균 시간 복잡도: O(n log n)
- 리스트가 균등하게 분할되는 경우입니다.
- 최선의 경우 시간 복잡도: O(n log n)
- 피벗이 항상 리스트의 중앙값을 선택하여 균등하게 분할되는 경우입니다.
특징
- 제자리 정렬(In-place Sort): 퀵 정렬은 추가적인 메모리 공간을 거의 사용하지 않습니다.
- 비교 기반 정렬(Comparison Sort): 요소들을 비교하여 정렬합니다.
- 불안정 정렬(Unstable Sort): 동일한 값의 요소들이 입력 순서를 유지하지 않을 수 있습니다.
결론
퀵 정렬은 평균적으로 매우 빠른 정렬 알고리즘으로, 대부분의 실용적인 정렬 작업에 사용될 수 있습니다. 제자리 정렬이 가능하고, 추가 메모리 사용이 적어 효율적입니다. 그러나 최악의 경우 시간 복잡도가 O(n^2)일 수 있으므로, 피벗 선택 최적화와 같은 다양한 최적화 기법을 사용하여 성능을 향상시킬 수 있습니다.
Radix Sort
Radix Sort(기수 정렬)은 정수나 문자열의 자릿수를 기준으로 정렬하는 효율적인 정수 정렬 알고리즘입니다. 이 알고리즘은 주로 양의 정수나 고정 길이의 문자열을 정렬하는 데 사용되며, 시간 복잡도가 O(d * (n + k))로, 비교 기반 정렬 알고리즘보다 더 효율적일 수 있습니다. 여기서 d는 데이터의 최대 자릿수, n은 요소의 수, k는 기수(예: 10진법에서는 10)입니다.
기본 개념
기수 정렬은 LSD(Least Significant Digit)와 MSD(Most Significant Digit) 두 가지 방법으로 나뉩니다:
- LSD 방식: 가장 작은 자릿수부터 시작하여 큰 자릿수 방향으로 정렬합니다.
- MSD 방식: 가장 큰 자릿수부터 시작하여 작은 자릿수 방향으로 정렬합니다.
LSD 방식은 일반적으로 더 많이 사용됩니다.
과정
- 최대 자릿수 결정: 데이터 중 가장 큰 수의 자릿수를 구합니다.
- 자릿수별 정렬: 각 자릿수에 대해 정렬을 수행합니다. 이때, 안정 정렬 알고리즘(예: Counting Sort)을 사용하여 정렬합니다.
예제
다음은 자바스크립트로 구현한 기수 정렬의 예제입니다(LSD 방식).
function getDigit(num, place) {
  return Math.floor(Math.abs(num) / Math.pow(10, place)) % 10
}

function digitCount(num) {
  if (num === 0) return 1
  return Math.floor(Math.log10(Math.abs(num))) + 1
}

function mostDigits(nums) {
  let maxDigits = 0
  for (let num of nums) {
    maxDigits = Math.max(maxDigits, digitCount(num))
  }
  return maxDigits
}

function radixSort(nums) {
  let maxDigitCount = mostDigits(nums)
  for (let k = 0; k < maxDigitCount; k++) {
    let digitBuckets = Array.from({ length: 10 }, () => [])
    for (let i = 0; i < nums.length; i++) {
      let digit = getDigit(nums[i], k)
      digitBuckets[digit].push(nums[i])
    }
    nums = [].concat(...digitBuckets)
  }
  return nums
}

let arr = [170, 45, 75, 90, 802, 24, 2, 66]
console.log(radixSort(arr)) // [2, 24, 45, 66, 75, 90, 170, 802]
시간 복잡도
기수 정렬의 시간 복잡도는 다음과 같습니다:
- 최악의 경우 시간 복잡도: O(d * (n + k))
- 평균 시간 복잡도: O(d * (n + k))
- 최선의 경우 시간 복잡도: O(d * (n + k))
여기서 d는 데이터의 최대 자릿수, n은 요소의 수, k는 기수(예: 10진법에서는 10)입니다.
특징
- 비교 기반 정렬이 아님: 요소들을 비교하지 않고 자릿수를 기준으로 정렬합니다.
- 안정 정렬: 동일한 값의 요소들이 입력 순서를 유지합니다.
- 제자리 정렬이 아님: 추가적인 메모리 공간이 필요합니다.
장점
- 효율성: 특정 조건에서 비교 기반 정렬보다 효율적일 수 있습니다.
- 안정성: 동일한 값의 요소들이 입력 순서를 유지합니다.
단점
- 제자리 정렬 아님: 추가적인 메모리 공간이 필요합니다.
- 데이터 타입 제한: 주로 정수나 고정 길이 문자열에만 적용할 수 있습니다.
- 자릿수에 민감: 데이터의 자릿수가 많을 경우 성능이 떨어질 수 있습니다.
결론
기수 정렬은 정수나 고정 길이 문자열을 정렬하는 데 매우 효율적인 알고리즘입니다. 비교 기반 정렬 알고리즘에 비해 더 나은 성능을 보일 수 있지만, 데이터 타입과 자릿수에 제한이 있습니다. 큰 데이터셋이나 자릿수가 많은 데이터의 경우, 기수 정렬의 성능이 떨어질 수 있습니다. 이러한 경우 다른 정렬 알고리즘과 병행하여 사용하거나, 상황에 맞는 알고리즘을 선택하는 것이 좋습니다.
Single Linked List
JavaScript에서 링크드 리스트(Linked List)는 노드(Node)들이 포인터로 연결된 데이터 구조로, 각 노드는 데이터와 다음 노드를 가리키는 포인터를 포함합니다. 링크드 리스트는 배열(Array)과 비교했을 때 몇 가지 주요 차이점이 있습니다.
기본 개념
- 노드(Node): 링크드 리스트의 각 요소는 노드라고 불리며, 데이터와 다음 노드를 가리키는 포인터를 포함합니다.
- 헤드(Head): 링크드 리스트의 시작 노드를 가리킵니다.
- 테일(Tail): 링크드 리스트의 마지막 노드를 가리킵니다.
- 포인터(Next): 각 노드는 다음 노드를 가리키는 포인터를 포함합니다.
링크드 리스트의 구조
링크드 리스트는 주로 단일 연결 리스트(Singly Linked List)와 이중 연결 리스트(Doubly Linked List)로 나뉩니다. 단일 연결 리스트에서는 각 노드가 다음 노드만 가리키지만, 이중 연결 리스트에서는 각 노드가 다음 노드와 이전 노드를 모두 가리킵니다.
자바스크립트로 구현한 링크드 리스트
다음은 자바스크립트로 단일 연결 리스트를 구현한 예제입니다:
class Node {
  constructor(data) {
    this.data = data
    this.next = null
  }
}

class SingleLinkedList {
  constructor() {
    this.length = 0
    this.head = null
    this.tail = null
  }

  push(data) {
    var newNode = new Node(data)
    // list가 비어 있다면, head와 tail을 모두 새 노드로 설정합니다.
    if (!this.head) {
      this.head = newNode
      this.tail = newNode
    } else {
      // 기존 node - tail의 next에 newNode 삽입
      this.tail.next = newNode
      // 리스트의 끝이므로 tail에 newNode 삽입
      this.tail = newNode
    }
    this.length++
    return this
  }

  traverse() {
    var current = this.head
    while (current) {
      console.log('current:', current)
      current = current.next
    }
  }

  pop() {
    if (!this.head) return undefined
    let current = this.head
    let newTail = this.head

    // while 문 조건 이해하기
    while (current.next) {
      newTail = current
      current = current.next
    }

    this.tail = newTail
    this.tail.next = null
    this.length--

    if (this.length === 0) {
      this.head = null
      this.tail = null
    }

    return current
  }

  shift() {
    // if there are no nodes, return undefined
    // Store the current head property in a variable
    // Set the head property to be the current head's next property
    // Decrement the length by 1
    // Return the value of the node removed

    if (!this.head) return undefined

    let currentHead = this.head

    this.head = currentHead.next
    this.length--

    if (this.length === 0) {
      this.tail = null
    }

    return currentHead
  }

  unshift(data) {
    // This function should accept a value
    // Create a new node using the value passed to the function
    // If there is no head property on the list, set the head and tail to be the newly created node
    let newNode = new Node(data)

    if (!this.head) {
      this.head = newNode
      this.tail = newNode
    } else {
      newNode.next = this.head
      this.head = newNode
    }

    this.length++

    return this
  }

  get(index) {
    // 인덱스가 음수이거나 리스트의 길이보다 큰 경우 null을 반환합니다.
    if (index < 0 || index >= this.length) return null

    let cnt = 0
    let currentHead = this.head

    while (cnt !== index) {
      currentHead = currentHead.next
      cnt++
    }

    return currentHead
  }

  set(index, data) {
    // This function should accept a data an an index
    // Use your get function to find the specific node
    // If the node is not found, return false
    // If the node is found, set the value of that node to be the value passed to the function and return true
    if (index < 0 || index >= this.length) return null

    let current = this.get(index)
    if (!current) return false

    current.data = data

    return true
  }

  insert(index, data) {
    // If the index is less than zero or greater than the length, return false
    // If the index is the same as the length, push a new node to the end of the list
    // If the index is 0, unshift a new node to the start of the list
    // Otherwise, using the 'get' method, access the node at the index -1
    // Set the next property on that node to be the new node
    // Set the next property on the new node to be the previous next
    // Increment the length
    // Return true;

    if (index < 0 || index > this.length) return false

    if (index === this.length) {
      // 'push'
      this.push(data)
      return true
    }

    if (index === 0) {
      // 'unshift'
      this.unshift(data)
      return true
    }

    // 'normal case'
    let newNode = new Node(data)

    let prevNode = this.get(index - 1)
    newNode.next = prevNode.next
    prevNode.next = newNode

    this.length++
    return true
  }

  remove(index) {
    // If the index is less than zero or greater than the length, return undefined
    // If the index is the same as the length-1, 'pop'
    // If the index is 0, 'shift'
    // Otherwise, using the 'get' method, access the node at the index -1
    // Set the next property on that node to be the next of the next node
    // Decrement the length
    // Return the value of the node removed

    if (index < 0 || index > this.length) return false

    if (index === this.length - 1) {
      // 'pop'
      this.pop()
      return true
    }

    if (index === 0) {
      // 'shift'
      this.shift()
      return true
    }

    let prevNode = this.get(index - 1)
    let nextNode = prevNode.next.next

    prevNode.next = nextNode

    this.length--
    return true
  }

  reverse() {
    // Swap the head and tail
    // Create a variable called next
    // Create a variable called prev
    // Create a variable called node and initialize it to the head property
    // Loop through the list
    // See the next to be the next property on whatever node is
    // Set thee next property on the node to be whatever prev is
    // Set prev to be the value of the node variable
    // Set the node variable to be the value of the next variable

    let node = this.head
    this.head = this.tail
    this.tail = node

    let next
    let prev = null
    for (let i = 0; i < this.length; i++) {
      next = node.next
      node.next = prev
      prev = node
      node = next
    }
    return this
  }
}

var list = new SingleLinkedList()list.push('Hi')
list.push('there')
list.push('!')
list.unshift('Yo')
console.log(list.set(0, 'Yo Bro'))
console.log('-- list:', list)
list.insert(0, 'Wassup')
console.log('--- list:', list)
list.insert(5, '💓')
console.log('--- list', list)
list.insert(1, '❤️')
console.log('--- list', list)
list.remove(7)
console.log('--- list', list)
list.remove(0)
console.log('--- list', list)
list.remove(1)
console.log('--- list', list)배열(Array)와의 차이점
- 메모리 할당 방식:
- 배열: 연속된 메모리 공간에 요소들이 저장됩니다. 인덱스를 통해 빠르게 접근할 수 있습니다.
- 링크드 리스트: 요소들이 불연속적인 메모리 공간에 저장됩니다. 각 요소는 포인터를 통해 연결됩니다.
- 접근 시간:
- 배열: 인덱스를 통해 O(1) 시간 복잡도로 임의의 요소에 접근할 수 있습니다.
- 링크드 리스트: 특정 요소에 접근하려면 첫 번째 노드부터 순차적으로 탐색해야 하므로, 평균적으로 O(n) 시간 복잡도가 소요됩니다.
- 삽입 및 삭제:
- 배열: 특정 위치에 요소를 삽입하거나 삭제하려면 요소들을 이동해야 하므로, 평균적으로 O(n) 시간이 걸립니다.
- 링크드 리스트: 특정 위치에 요소를 삽입하거나 삭제할 때 요소들을 이동할 필요가 없으므로, 삽입과 삭제는 O(1) 시간 복잡도로 수행됩니다. 단, 삽입 또는 삭제할 위치를 찾기 위해 O(n) 시간이 소요될 수 있습니다.
- 메모리 사용:
- 배열: 메모리를 효율적으로 사용하지만, 크기를 변경할 때는 새로운 메모리 할당이 필요할 수 있습니다.
- 링크드 리스트: 각 요소마다 추가적인 포인터를 저장하기 위한 메모리가 필요하므로, 배열보다 메모리 사용량이 많을 수 있습니다.
- 연결성:
- 배열: 고정된 크기의 데이터 구조로, 크기를 변경하려면 새로운 배열을 할당하고 기존 요소들을 복사해야 합니다.
- 링크드 리스트: 동적으로 크기를 변경할 수 있으며, 노드를 추가하거나 제거하는 것이 상대적으로 간단합니다.
결론
링크드 리스트와 배열은 각기 다른 장점과 단점을 가지고 있으며, 사용 목적에 따라 적절한 데이터 구조를 선택하는 것이 중요합니다. 배열은 빠른 접근 시간이 필요한 경우에 적합하고, 링크드 리스트는 빈번한 삽입과 삭제가 필요한 경우에 유리합니다.
Double Linked List
더블 링크드 리스트(Doubly Linked List)는 각 노드가 두 개의 포인터를 가지는 링크드 리스트입니다. 하나는 다음 노드를 가리키고, 다른 하나는 이전 노드를 가리킵니다. 이를 통해 리스트의 양방향 탐색이 가능해집니다.
주요 특징
- 노드 구조(Node Structure): 각 노드는 data, next, prev 세 가지 속성을 가집니다.
- data: 노드가 저장하는 데이터
- next: 다음 노드를 가리키는 포인터
- prev: 이전 노드를 가리키는 포인터
- 리스트의 구조(List Structure): 더블 링크드 리스트는 head와 tail 두 개의 포인터를 가집니다.
- head: 리스트의 첫 번째 노드를 가리킴
- tail: 리스트의 마지막 노드를 가리킴
- 양방향 탐색: 양방향으로 탐색이 가능하여, 앞뒤로 이동하며 데이터를 처리할 수 있습니다.
주요 연산
- 추가 (Insertion):
- 리스트의 앞에 추가: unshift
- 리스트의 끝에 추가: push
- 리스트의 중간에 추가: insert
- 제거 (Removal):
- 리스트의 앞에서 제거: shift
- 리스트의 끝에서 제거: pop
- 리스트의 중간에서 제거: remove
- 탐색 (Traversal):
- 인덱스를 이용한 노드 탐색: get
JavaScript로 구현하기
다음은 더블 링크드 리스트의 간단한 구현입니다.
class Node {
  constructor(data) {
    this.data = data
    this.next = null
    this.prev = null
  }
}

class DoubleLinkedList {
  constructor() {
    this.length = 0
    this.head = null
    this.tail = null
  }

  push(data) {
    // Create a new node with the value passed to the function
    // If the head property is null set the head and tail to be the newly created node
    // If not, set the next property on the tail to be that node
    // Set the previous property on the newly created node to be the tail
    // Set the tail to be the newly created node
    // Increment the length
    // Return the Doubly Linked List

    let newNode = new Node(data)

    if (!this.head) {
      this.head = newNode
      this.tail = newNode
    } else {
      let currentTail = this.tail

      this.tail.next = newNode
      this.tail = newNode
      this.tail.prev = currentTail
    }

    this.length++

    return this
  }

  pop() {
    // If there is no head, return undefined
    // Store the current tail in a variable to return later
    // If the length is 1, set the head and tail to be null
    // Update the tail to be previous Node
    // Set the newTail's next to null
    // Decrement the length
    // Return the value removed

    if (!this.head || this.length <= 0) return undefined
    let currentTail = this.tail

    if (this.length === 1) {
      this.head = null
      this.tail = null
    } else {
      currentTail.prev.next = null
      this.tail = currentTail.prev
      currentTail.prev = null
    }

    this.length--
    return currentTail
  }

  shift() {
    // If length is 0, return undefined
    // Store the current head property in a variable(we'll call it old head)
    // If the length is one > set the head to be null, set the tail to be null
    // Update the head to be the next of the old head
    // Set the head's prev property to null
    // Set the old head's next to null
    // Decrement the length
    // Return old head

    if (this.length === 0) return undefined
    let currentHead = this.head

    if (this.length === 1) {
      this.head = null
      this.tail = null
    } else {
      let newHead = this.head.next

      newHead.prev = null
      currentHead.next = null

      this.head = newHead
    }

    this.length--
    return currentHead
  }
  unshift(data) {
    // Create a new node with the value passed to the function
    // If the length is 0, Set the head to be the new node and Set the tail to be the new node
    // Other wise
    // Set the prev property on the head of the list to be the new node
    // Set the next property on the new node to be the head property
    // Update the head to be the new node
    // Increment the length
    // Return the list
    let newNode = new Node(data)

    if (this.length === 0) {
      this.head = newNode
      this.tail = newNode
    } else {
      newNode.next = this.head
      newNode.next.prev = newNode

      this.head = newNode
    }

    this.length++
    return this
  }

  traverse() {
    var current = this.head
    while (current) {
      console.log('current:', current)
      current = current.next
    }
  }

  get(index) {
    // If the index is less than 0 or greater or equal to the length, return null
    // If the index is less than or equal to half the length of the list
    // Loop through the list starting from the head and loop towards the middle
    // If the index is greater than half the length of the list
    // Loop through the list starting from the tail and loop towards the middle

    if (index < 0 || index >= this.length) return null

    let cnt = 0
    let currentValue = this.head

    if (index <= Math.floor(this.length / 2)) {
      // from head to tail
      while (cnt !== index) {
        currentValue = currentValue.next
        cnt++
      }
    } else {
      // from tail to head
      cnt = this.length - 1
      currentValue = this.tail

      while (cnt !== index) {
        currentValue = currentValue.prev
        cnt--
      }
    }

    return currentValue
  }

  set(index, data) {
    // Create a variable which is the result of the 'get' method at the index passed to the function
    // If the get method returns a valid node, set the value of that node to be the value passed to the function
    // Return true

    let currentNode = this.get(index)

    if (currentNode.data) {
      currentNode.data = data
      return true
    }

    return false
  }

  insert(index, data) {
    // If the index is less than zero or greater than or equal to the length, return false
    // If the index is 0, unshift
    // If the index is the same as the length, push
    // Use get method to access the index -1
    // Set the next and prev properties on the correct nodes to link everything together
    if (index < 0 || index > this.length) return false

    let newNode = new Node(data)

    if (index === 0) {
      this.unshift(newNode)
    } else if (index === this.length) {
      this.push(newNode)
    } else {
      let prevNode = this.get(index - 1)

      newNode.prev = prevNode
      newNode.next = prevNode.next
      prevNode.next = newNode
      prevNode.next.next.prev = newNode
    }
    this.length++

    return newNode
  }

  remove(index) {
    // If the index is less than zero or greater than or equal to the length return undefined
    // If the index is 0, shift
    // If the index is the same as the length-1, pop
    // Use the get method to retrieve the item to be removed
    // Update the next and prev properties to remove the found node from the list
    // Set next and prev to null on the found node
    // Decrement the length;
    // Return the removed node
    if (index < 0 || index > this.length) return false

    if (index === 0) {
      this.shift()
    } else if (index === this.length - 1) {
      this.pop()
    } else {
      let currentNode = this.get(index)
      let prevNode = currentNode.prev

      prevNode.next.next.prev = currentNode.prev
      prevNode.next = currentNode.next

      currentNode.prev = null
      currentNode.next = null

      this.length--
      return currentNode
    }
  }
}Array와의 차이점
- 메모리 사용: 링크드 리스트는 노드당 추가적인 포인터(next, prev)를 저장해야 하므로 메모리 사용이 배열보다 큽니다.
- 접근 시간: 배열은 인덱스를 통해 O(1) 시간에 요소에 접근할 수 있지만, 링크드 리스트는 O(n) 시간이 걸립니다.
- 삽입/삭제 시간: 배열은 중간에 삽입하거나 삭제할 때 O(n) 시간이 걸리지만, 링크드 리스트는 해당 위치를 찾는 시간(O(n)) 외에는 O(1) 시간에 가능합니다.
더블 링크드 리스트는 양방향 탐색이 가능하다는 장점이 있어, 삽입과 삭제가 빈번한 경우 유리합니다. 그러나 배열에 비해 메모리 사용량이 많고, 임의 접근이 느리다는 단점도 있습니다.
Stack
스택(Stack)은 후입선출(LIFO, Last In First Out) 원칙에 따라 데이터를 관리하는 자료 구조입니다. 이는 마지막에 삽입된 데이터가 가장 먼저 제거되는 구조를 의미합니다. 스택은 주로 재귀 알고리즘, 언어의 함수 호출, 실행 취소 기능 등에서 많이 사용됩니다.
주요 연산
- push: 스택의 맨 위에 데이터를 추가합니다.
- pop: 스택의 맨 위에 있는 데이터를 제거하고 반환합니다.
- peek (또는 top): 스택의 맨 위에 있는 데이터를 반환하지만 제거하지는 않습니다.
- isEmpty: 스택이 비어 있는지 확인합니다.
- size: 스택에 있는 데이터의 개수를 반환합니다.
스택의 특징
- LIFO: 마지막에 삽입된 데이터가 가장 먼저 제거됩니다.
- 제한된 접근: 스택은 오직 한쪽 끝에서만 데이터의 삽입과 제거가 가능합니다.
스택의 활용 예시
- 재귀 알고리즘: 함수 호출 시 호출된 함수가 완료될 때까지의 상태를 저장하는 데 사용됩니다.
- 웹 브라우저의 뒤로 가기 기능: 사용자가 방문한 페이지를 스택에 저장하고, 뒤로 가기 버튼을 누르면 스택의 맨 위 페이지를 제거하고 이전 페이지로 이동합니다.
- 텍스트 편집기의 실행 취소 기능: 사용자가 수행한 작업을 스택에 저장하고, 실행 취소 버튼을 누르면 마지막 작업을 제거하여 이전 상태로 되돌립니다.
JavaScript로 구현하기
다음은 JavaScript로 스택을 배열을 사용하여 구현한 예제입니다.
class Node {
  constructor(value) {
    this.value = value
    this.next = null
  }
}

class Stack {
  constructor() {
    this.top = null // 스택의 맨 위 요소
    this.size = 0 // 스택의 크기
  }

  // 스택에 요소 추가
  push(value) {
    const newNode = new Node(value)
    if (!this.top) {
      this.top = newNode
    } else {
      newNode.next = this.top
      this.top = newNode
    }
    this.size++
    return this
  }

  // 스택에서 요소 제거 및 반환
  pop() {
    if (!this.top) return null
    const removedNode = this.top
    this.top = this.top.next
    this.size--
    return removedNode.value
  }

  // 스택의 맨 위 요소 반환 (제거하지 않음)
  peek() {
    if (!this.top) return null
    return this.top.value
  }

  // 스택이 비어 있는지 확인
  isEmpty() {
    return this.size === 0
  }

  // 스택의 크기 반환
  getSize() {
    return this.size
  }
}

// 사용 예시
const stack = new Stack()
stack.push(10)
stack.push(20)
stack.push(30)

console.log(stack.peek()) // 30
console.log(stack.pop()) // 30
console.log(stack.getSize()) // 2
console.log(stack.isEmpty()) // false
console.log(stack.pop()) // 20
console.log(stack.pop()) // 10
console.log(stack.isEmpty()) // true배열과의 차이점
- 접근 방식: 스택은 LIFO 구조로 데이터에 접근하는 반면, 배열은 인덱스를 통해 임의 접근이 가능합니다.
- 연산 시간 복잡도: 스택의 push와 pop 연산은 O(1) 시간 복잡도를 가집니다. 배열에서도 끝에 요소를 추가하거나 제거하는 것은 O(1)이지만, 배열의 중간에 요소를 삽입하거나 제거하는 것은 O(n)입니다.
스택은 단순한 구조임에도 불구하고 다양한 알고리즘과 프로그램에서 유용하게 사용됩니다. 특히 재귀적 문제 해결, 실행 취소 기능, 함수 호출 관리 등에서 중요한 역할을 합니다.
Queue
큐(Queue)는 자료 구조의 한 형태로, 선입선출(FIFO, First In First Out) 원칙을 따릅니다. 즉, 먼저 삽입된 데이터가 먼저 삭제됩니다. 큐는 일상 생활의 줄 서기와 유사합니다. 예를 들어, 사람들이 줄을 서서 대기하는 경우, 줄의 맨 앞에 있는 사람이 가장 먼저 서비스받고 줄에서 나가며, 새로운 사람은 줄의 맨 뒤에 서게 됩니다.
큐의 기본 연산
- enqueue: 큐의 맨 뒤에 요소를 추가합니다.
- dequeue: 큐의 맨 앞에서 요소를 제거하고 반환합니다.
- peek/front: 큐의 맨 앞 요소를 반환하지만, 제거하지는 않습니다.
- isEmpty: 큐가 비어 있는지 확인합니다.
- size: 큐의 요소 개수를 반환합니다.
큐의 활용 사례
- 운영 체제: 작업 스케줄링 및 프로세스 관리에서 사용됩니다.
- 프린터 관리: 인쇄 대기열에서 사용됩니다.
- 네트워크: 데이터 패킷의 전송 순서 관리를 위해 사용됩니다.
- 콜 센터 대기열: 고객 서비스에서 콜 대기열 관리에 사용됩니다.
큐의 구현 방법
큐는 배열이나 링크드 리스트를 사용하여 구현할 수 있습니다. 배열을 사용한 구현은 고정된 크기를 가지며, 링크드 리스트를 사용한 구현은 동적 크기를 가집니다.
배열 기반 구현
배열을 사용한 큐는 정적 크기를 가지며, 요소를 추가하거나 제거할 때마다 배열을 이동시키는 방식입니다.
class ArrayQueue {
  constructor() {
    this.queue = []
  }

  enqueue(value) {
    this.queue.push(value)
  }

  dequeue() {
    return this.queue.shift()
  }

  peek() {
    return this.queue[0]
  }

  isEmpty() {
    return this.queue.length === 0
  }

  size() {
    return this.queue.length
  }
}링크드 리스트 기반 구현
링크드 리스트를 사용한 큐는 동적 크기를 가지며, 요소를 추가하거나 제거할 때 포인터를 이동시키는 방식입니다.
class Node {
  constructor(value) {
    this.value = value
    this.next = null
  }
}

class LinkedListQueue {
  constructor() {
    this.first = null // 큐의 맨 앞 요소
    this.last = null // 큐의 맨 뒤 요소
    this.size = 0 // 큐의 크기
  }

  enqueue(value) {
    const newNode = new Node(value)
    if (!this.first) {
      this.first = newNode
      this.last = newNode
    } else {
      this.last.next = newNode
      this.last = newNode
    }
    this.size++
    return this
  }

  dequeue() {
    if (!this.first) return null
    const removedNode = this.first
    if (this.first === this.last) {
      this.last = null
    }
    this.first = this.first.next
    this.size--
    return removedNode.value
  }

  peek() {
    if (!this.first) return null
    return this.first.value
  }

  isEmpty() {
    return this.size === 0
  }

  getSize() {
    return this.size
  }
}

// 사용 예시
const queue = new LinkedListQueue()
queue.enqueue(10)
queue.enqueue(20)
queue.enqueue(30)

console.log(queue.peek()) // 10
console.log(queue.dequeue()) // 10
console.log(queue.getSize()) // 2
console.log(queue.isEmpty()) // false
console.log(queue.dequeue()) // 20
console.log(queue.dequeue()) // 30
console.log(queue.isEmpty()) // true이렇게 구현된 큐는 링크드 리스트를 사용하여 동적 크기를 가지며, 요소의 추가와 제거가 O(1) 시간 복잡도로 이루어집니다. 이는 큐의 효율적인 동작을 보장합니다.
Binary Search Tree
이진 탐색 트리(Binary Search Tree, BST)는 데이터의 효율적인 저장, 검색, 삽입 및 삭제를 위해 사용되는 트리 구조입니다. 각 노드가 최대 두 개의 자식 노드를 가지며, 왼쪽 자식 노드의 값은 부모 노드의 값보다 작고, 오른쪽 자식 노드의 값은 부모 노드의 값보다 큽니다. 이러한 특성 덕분에 이진 탐색 트리는 정렬된 데이터를 효율적으로 처리할 수 있습니다.
이진 탐색 트리의 특성
- 모든 노드의 값은 유일합니다.
- 왼쪽 서브트리의 모든 노드 값은 부모 노드 값보다 작습니다.
- 오른쪽 서브트리의 모든 노드 값은 부모 노드 값보다 큽니다.
- 왼쪽 및 오른쪽 서브트리도 각각 이진 탐색 트리입니다.
주요 연산
- 삽입 (Insert): 새로운 값을 올바른 위치에 추가합니다.
- 검색 (Search): 특정 값이 트리에 존재하는지 확인합니다.
이진 탐색 트리의 구현 (자바스크립트 예제)
class Node {
  constructor(value) {
    this.value = value
    this.left = null
    this.right = null
  }
}

class BinarySearchTree {
  constructor() {
    this.root = null
  }

  insert(value) {
    // Create a new node
    // Starting at the root
    // Check if there is a root, if not - the root now becomes that new node
    // If there is a root, check if the value of the new node is greater than or less than the value of the root

    // If it is greater
    // Check to see if there is a node to the right
    // If there is, move to that node and repeat these steps
    // If there is not, add that node as the right property

    // If it is less
    // Check to see if there a node to the left
    // If there is, move to that node and repeat these steps
    // If there is not, add that node as the left property
    let newNode = new Node(value)

    if (!this.root) {
      this.root = newNode
      return this
    }

    let current = this.root

    while (true) {
      if (value === current.value) return undefined

      if (value < current.value) {
        if (current.left === null) {
          current.left = newNode
          return this
        }
        current = current.left
      } else if (value > current.value) {
        if (current.right === null) {
          current.right = newNode
          return this
        }
        current = current.right
      }
    }
  }

  search(value) {
    // Starting at the root
    // Check if there is a root, if not - we're done searching!
    // If there is a root, check if the value of the new node is the value we are looking for.
    // If we found it, we're done!
    // If not, check to see if the value is greater than or less than the value of the root
    // If it is greater
    // Check to see if there is a node to the right
    // If there is, move to that node and repeat these steps
    // If there is not, we're done searching
    // If it is less
    // Check to see if there is a node to the left
    // If there is, move to that node and repeat these steps
    // If there is not, we're done searching!

    if (!this.root) return false

    let current = this.root
    let found = false

    while (current && !found) {
      if (value < current.value) {
        current = current.left
      } else if (value > current.value) {
        current = current.right
      } else {
        return true
      }
    }

    return false
  }
}

let tree = new BinarySearchTree()

console.log('tree is:', tree)
tree.insert(10)
tree.insert(5)
tree.insert(15)
tree.insert(17)
tree.insert(7)
tree.insert(3)
tree.insert(13)
console.log('tree is:', tree)

console.log(tree.search(13))
console.log(tree.search(19))설명
- Node 클래스:
- value: 노드의 값.
- left: 왼쪽 자식 노드.
- right: 오른쪽 자식 노드.
- BinarySearchTree 클래스:
- root: 트리의 루트 노드.
- insert(value):
- 새 노드를 생성하고 올바른 위치에 삽입합니다.
- 루트 노드가 없으면 새 노드를 루트로 설정합니다.
- 루트 노드가 있으면 값을 비교하여 왼쪽 또는 오른쪽 자식 노드로 이동하면서 삽입 위치를 찾습니다.
- search(value):
- 트리에서 특정 값을 가진 노드를 찾습니다.
- 루트 노드부터 시작하여 값을 비교하면서 왼쪽 또는 오른쪽으로 이동합니다.
이진 탐색 트리는 삽입, 삭제, 검색 연산이 평균적으로 O(log n) 시간 복잡도를 가지며, 최악의 경우(편향 트리)에는 O(n) 시간 복잡도를 가집니다. 균형 잡힌 트리를 유지하기 위해 AVL 트리, 레드-블랙 트리와 같은 변형 트리를 사용할 수 있습니다.
Breadth First Search
너비 우선 탐색(Breadth-First Search, BFS)은 그래프 또는 트리의 노드를 탐색하는 방법 중 하나입니다. BFS는 시작 노드에서 출발하여 인접한 노드를 먼저 탐색하고, 그 다음 인접한 노드들의 인접 노드를 탐색하는 방식으로 진행됩니다. 이는 주로 큐(queue) 자료 구조를 사용하여 구현됩니다.
BFS의 특징
- 레벨별 탐색: BFS는 트리 또는 그래프의 레벨을 기준으로 노드를 탐색합니다. 즉, 첫 번째 레벨(루트 노드)에서 시작하여 다음 레벨로 진행합니다.
- 최단 경로 탐색: 무방향 그래프에서 BFS는 시작 노드에서 다른 노드로 가는 최단 경로를 찾을 수 있습니다.
- 큐 사용: BFS는 FIFO(First In, First Out) 특성을 가진 큐를 사용하여 다음에 탐색할 노드를 관리합니다.
BFS의 구현 (자바스크립트 예제)
트리와 그래프를 위한 BFS의 구현 예제를 살펴보겠습니다.
트리에서의 BFS 구현
class Node {
  constructor(value) {
    this.value = value
    this.left = null
    this.right = null
  }
}

class BinarySearchTree {
  constructor() {
    this.root = null
  }

  insert(value) {
    let newNode = new Node(value)

    if (!this.root) {
      this.root = newNode
      return this
    }

    let current = this.root

    while (true) {
      if (value === current.value) return undefined

      if (value < current.value) {
        if (current.left === null) {
          current.left = newNode
          return this
        }
        current = current.left
      } else if (value > current.value) {
        if (current.right === null) {
          current.right = newNode
          return this
        }
        current = current.right
      }
    }
  }

  find(value) {
    if (!this.root) return false

    let current = this.root
    let found = false

    while (current && !found) {
      if (value < current.value) {
        current = current.left
      } else if (value > current.value) {
        current = current.right
      } else {
        return true
      }
    }

    return false
  }

  BFS() {
    // Create a queue (this can be an array) and a variable to store the values of nodes visited
    // Place the root node in the queue
    // Loop as long as there is anything in the queue
    // Dequeue a node from the queue and push the value of the node into the variable that stroes the nodes
    // If there is a left property on the node dequeud - add it to the queue
    // If there is a right property on the node dequeued - add it to the queue
    // Return the variable that stores the values

    let visited = []
    let queue = []
    let currentNode = this.root

    queue.push(currentNode)

    while (queue.length) {
      currentNode = queue.shift()
      visited.push(currentNode.value)

      if (currentNode.left) queue.push(currentNode.left)
      if (currentNode.right) queue.push(currentNode.right)
    }
    return visited
  }
}

let tree = new BinarySearchTree()

console.log('tree is:', tree)
tree.insert(10)
tree.insert(5)
tree.insert(15)
tree.insert(17)
tree.insert(7)
tree.insert(3)
tree.insert(13)
console.log('tree is:', tree)

console.log(tree.find(13))
console.log(tree.find(19))

console.log('BFS:', tree.BFS())BFS의 동작 원리
- 큐 초기화: 시작 노드를 큐에 추가합니다.
- 큐가 빌 때까지 반복:
- 큐에서 첫 번째 노드를 꺼내 현재 노드로 설정합니다.
- 현재 노드를 방문 처리하고 결과 목록에 추가합니다.
- 현재 노드의 모든 인접 노드를 큐에 추가합니다(이미 방문한 노드는 제외).
- 반복 종료: 큐가 비면 탐색이 완료되고, 결과 목록을 반환합니다.
BFS의 시간 복잡도
BFS의 시간 복잡도는 그래프의 노드 수(V)와 엣지 수(E)에 따라 O(V + E)입니다. 이는 모든 노드와 엣지를 한 번씩 방문하기 때문입니다. 트리의 경우 노드 수가 n일 때, 시간 복잡도는 O(n)입니다.
BFS는 너비 우선으로 탐색하여 최단 경로를 찾는 문제에 적합하며, 모든 경로를 완전히 탐색해야 할 때 유용하게 사용됩니다.
Depth First Search
깊이 우선 탐색(Depth-First Search, DFS)은 그래프 또는 트리의 노드를 탐색하는 방법 중 하나로, 가능한 한 깊이 있는 노드를 우선으로 탐색합니다. DFS는 스택(stack) 자료 구조를 사용하여 구현할 수 있으며, 재귀적으로도 쉽게 구현할 수 있습니다.
DFS의 특징
- 깊이 우선 탐색: 가능한 한 깊이 있는 노드를 먼저 탐색하고, 더 이상 깊이 갈 수 없을 때 다음 인접한 노드로 이동합니다.
- 스택 사용: DFS는 LIFO(Last In, First Out) 특성을 가진 스택을 사용하여 다음에 탐색할 노드를 관리합니다. 재귀적 구현에서는 함수 호출 스택을 사용합니다.
- 경로 탐색: 그래프나 트리에서 경로를 탐색할 때 유용하며, 모든 경로를 탐색하는 문제에 적합합니다.
DFS의 구현 (자바스크립트 예제)
트리에서의 DFS 구현 (재귀 사용)
class Node {
  constructor(value) {
    this.value = value
    this.left = null
    this.right = null
  }
}

class BinarySearchTree {
  constructor() {
    this.root = null
  }

  insert(value) {
    let newNode = new Node(value)

    if (!this.root) {
      this.root = newNode
      return this
    }

    let current = this.root

    while (true) {
      if (value === current.value) return undefined

      if (value < current.value) {
        if (current.left === null) {
          current.left = newNode
          return this
        }
        current = current.left
      } else if (value > current.value) {
        if (current.right === null) {
          current.right = newNode
          return this
        }
        current = current.right
      }
    }
  }

  find(value) {
    if (!this.root) return false

    let current = this.root
    let found = false

    while (current && !found) {
      if (value < current.value) {
        current = current.left
      } else if (value > current.value) {
        current = current.right
      } else {
        return true
      }
    }

    return false
  }

  DFS() {
    // Create a variable to store the values of nodes visited
    // Store the root of the BST in a variable called current
    // Write a helper function which accepts a node
    // Push the value of the node to the variable that stores the values
    // If the node has a left property, call the helper function with the left property on the node
    // If the node has a right property, call the helper function with the right property on the node
    // Invoke the helper function with the current variable
    // Return the array of values

    let visited = []
    let currentNode = this.root

    function preorder(node) {
      visited.push(node.value)

      if (node.left) preorder(node.left)
      if (node.right) preorder(node.right)
    }

    preorder(currentNode)

    return visited
  }
}

let tree = new BinarySearchTree()

console.log('tree is:', tree)
tree.insert(10)
tree.insert(5)
tree.insert(15)
tree.insert(17)
tree.insert(7)
tree.insert(3)
tree.insert(13)
console.log('tree is:', tree)

console.log(tree.find(13))
console.log(tree.find(19))

console.log('DFS:', tree.DFS())DFS의 동작 원리
- 시작 노드에서 출발: DFS는 시작 노드에서 출발하여 깊이 있는 노드를 먼저 탐색합니다.
- 재귀적 또는 반복적 접근: 재귀적으로 함수 호출을 통해 깊이 있는 노드를 탐색하거나, 스택을 사용하여 반복적으로 노드를 탐색합니다.
- 방문 표시: 각 노드는 방문되면 방문 표시를 합니다.
- 백트래킹: 더 이상 깊이 갈 수 없는 경우, 이전 노드로 되돌아가서 다른 경로를 탐색합니다.
DFS의 시간 복잡도
DFS의 시간 복잡도는 그래프의 노드 수(V)와 엣지 수(E)에 따라 O(V + E)입니다. 이는 모든 노드와 엣지를 한 번씩 방문하기 때문입니다. 트리의 경우 노드 수가 n일 때, 시간 복잡도는 O(n)입니다.
DFS는 경로 탐색, 사이클 탐지, 강력 연결 요소 찾기 등 다양한 문제에 유용하게 사용됩니다. 또한, 그래프의 모든 노드를 방문해야 하는 문제에 적합합니다.
Binary Heap
이진 힙(Binary Heap)은 완전 이진 트리(Complete Binary Tree)의 일종으로, 힙 속성을 만족하는 자료 구조입니다. 힙 속성은 다음과 같은 두 가지 형태로 구분됩니다:
- 최대 힙(Max Heap): 부모 노드의 값이 자식 노드의 값보다 크거나 같은 구조.
- 최소 힙(Min Heap): 부모 노드의 값이 자식 노드의 값보다 작거나 같은 구조.

이진 힙의 특징
- 완전 이진 트리: 이진 힙은 항상 완전 이진 트리입니다. 즉, 모든 레벨이 완전히 채워져 있고, 마지막 레벨의 경우 왼쪽부터 차례대로 노드가 채워져 있습니다.
- 힙 속성: 최대 힙에서는 부모 노드의 값이 자식 노드의 값보다 크거나 같고, 최소 힙에서는 부모 노드의 값이 자식 노드의 값보다 작거나 같습니다.
이진 힙의 구현
이진 힙은 주로 배열을 사용하여 구현됩니다. 배열을 사용하면 부모와 자식 노드 간의 관계를 인덱스를 통해 쉽게 접근할 수 있습니다.
- 부모 노드의 인덱스: Math.floor((i - 1) / 2)
- 왼쪽 자식 노드의 인덱스: 2 * i + 1
- 오른쪽 자식 노드의 인덱스: 2 * i + 2


최대 힙의 구현 (자바스크립트 예제)
class MaxBinaryHeap {
  constructor() {
    this.values = []
  }

  insert(value) {
    // Push the value into the values property on the heap
    // Bubble the value up to its correct spot!
    this.values.push(value)
    this.bubbleUp()
  }

  bubbleUp() {
    // Create a variable called index which is the length of the values property - 1
    // Create a variable called parentIndex which is the floor of (index-1)/2
    // Keep looping as long as the values element at the parentIndex is less than the values element at the child index
    // Swap the value of the values element at the parentIndex with the value of the element property at the child index
    // Set the index to be th parentIndex, and start over!

    let idx = this.values.length - 1
    const element = this.values[idx]

    while (idx > 0) {
      let parentIdx = Math.floor((idx - 1) / 2)
      let parentElement = this.values[parentIdx]

      if (element <= parentElement) break

      this.values[parentIdx] = element
      this.values[idx] = parentElement
      idx = parentIdx
    }
  }

  extractMax() {
    // Swap the first value in the values property with the last one
    // Pop from the values property, so you can return the value at the end
    // Have the new root "sink down" to the correct spot
    // Your parent index starts at 0 (the root)
    // Find the index of the left child: 2 * idx + 1
    // Find the index of the right child: 2 * idx + 2
    // If the left or right child is greater than the element > swap
    // If both left and right children are larger, swap with the largest child
    // The child index you swapped to now becomes the new parent index
    // Keep looping and swapping until neither child is larger than the element
    // Return the old root
    const max = this.values[0]
    const end = this.values.pop()
    if (this.values.length > 0) {
      this.values[0] = end
      this.sinkDown()
    }
    return max
  }

  sinkDown() {
    let idx = 0
    const length = this.values.length
    const element = this.values[0]
    while (true) {
      let leftChildIdx = 2 * idx + 1
      let rightChildIdx = 2 * idx + 2
      let leftChild, rightChild
      let swap = null

      if (leftChildIdx < length) {
        leftChild = this.values[leftChildIdx]
        if (leftChild > element) {
          swap = leftChildIdx
        }
      }
      if (rightChildIdx < length) {
        rightChild = this.values[rightChildIdx]
        if (
          (swap === null && rightChild > element) ||
          (swap !== null && rightChild > leftChild)
        ) {
          swap = rightChildIdx
        }
      }
      if (swap === null) break
      this.values[idx] = this.values[swap]
      this.values[swap] = element
      idx = swap
    }
  }
}

let maxBinaryHeap = new MaxBinaryHeap()
maxBinaryHeap.insert(41)
maxBinaryHeap.insert(39)
maxBinaryHeap.insert(33)
maxBinaryHeap.insert(18)
maxBinaryHeap.insert(27)
maxBinaryHeap.insert(12)

maxBinaryHeap.insert(55)
// [41,39,33,18,27,12,55]
//  0  1  2  3  4  5  6

console.log('maxBinaryHeap:', maxBinaryHeap)최소 힙의 구현 (자바스크립트 예제)
최소 힙은 최대 힙과 거의 동일한 방식으로 구현되지만, 힙 속성을 유지하기 위해 부모와 자식 노드의 크기 비교가 반대입니다.
class MinBinaryHeap {
  constructor() {
    this.values = []
  }

  insert(value) {
    // Push the value into the values property on the heap
    // Bubble the value up to its correct spot!
    this.values.push(value)
    this.bubbleUp()
  }

  bubbleUp() {
    // Create a variable called index which is the length of the values property - 1
    // Create a variable called parentIndex which is the floor of (index-1)/2
    // Keep looping as long as the values element at the parentIndex is less than the values element at the child index
    // Swap the value of the values element at the parentIndex with the value of the element property at the child index
    // Set the index to be th parentIndex, and start over!

    let idx = this.values.length - 1
    const element = this.values[idx]

    while (idx > 0) {
      let parentIdx = Math.floor((idx - 1) / 2)
      let parentElement = this.values[parentIdx]

      if (element >= parentElement) break

      this.values[parentIdx] = element
      this.values[idx] = parentElement
      idx = parentIdx
    }
  }

  extractMax() {
    // Swap the first value in the values property with the last one
    // Pop from the values property, so you can return the value at the end
    // Have the new root "sink down" to the correct spot
    // Your parent index starts at 0 (the root)
    // Find the index of the left child: 2 * idx + 1
    // Find the index of the right child: 2 * idx + 2
    // If the left or right child is greater than the element > swap
    // If both left and right children are larger, swap with the largest child
    // The child index you swapped to now becomes the new parent index
    // Keep looping and swapping until neither child is larger than the element
    // Return the old root
    const max = this.values[0]
    const end = this.values.pop()
    if (this.values.length > 0) {
      this.values[0] = end
      this.sinkDown()
    }
    return max
  }

  sinkDown() {
    let idx = 0
    const length = this.values.length
    const element = this.values[0]
    while (true) {
      let leftChildIdx = 2 * idx + 1
      let rightChildIdx = 2 * idx + 2
      let leftChild, rightChild
      let swap = null

      if (leftChildIdx < length) {
        leftChild = this.values[leftChildIdx]
        if (leftChild < element) {
          swap = leftChildIdx
        }
      }
      if (rightChildIdx < length) {
        rightChild = this.values[rightChildIdx]
        if (
          (swap === null && rightChild < element) ||
          (swap !== null && rightChild < leftChild)
        ) {
          swap = rightChildIdx
        }
      }
      if (swap === null) break
      this.values[idx] = this.values[swap]
      this.values[swap] = element
      idx = swap
    }
  }
}

let minBinaryHeap = new MinBinaryHeap()
minBinaryHeap.insert(41)
minBinaryHeap.insert(39)
minBinaryHeap.insert(33)
minBinaryHeap.insert(18)
minBinaryHeap.insert(27)
minBinaryHeap.insert(12)

minBinaryHeap.insert(55)
// [12, 27, 18, 41, 33, 39, 55]
//  0  1  2  3  4  5  6

console.log('minBinaryHeap:', minBinaryHeap)이진 힙의 시간 복잡도
- 삽입 및 삭제: O(log n) - 힙의 높이가 log n이기 때문에 삽입과 삭제 모두 log n 시간에 수행됩니다.
- 검색: O(n) - 힙에서 특정 값을 검색하려면 모든 노드를 확인해야 할 수 있습니다.
이진 힙은 우선순위 큐를 구현할 때 주로 사용됩니다. 최소 힙은 우선순위가 낮은 요소를 먼저 처리해야 할 때, 최대 힙은 우선순위가 높은 요소를 먼저 처리해야 할 때 유용합니다.
Priority Queue
우선순위 큐(Priority Queue)는 각 요소가 우선순위를 가지는 데이터 구조로, 일반적인 큐와 달리 요소들이 우선순위에 따라 제거됩니다. 우선순위 큐는 큐의 일종이지만, 요소를 삽입할 때 그 우선순위에 따라 적절한 위치에 배치하고, 제거할 때는 가장 높은(또는 낮은) 우선순위를 가진 요소를 먼저 제거합니다.
우선순위 큐의 특징
- 우선순위에 따른 요소 관리: 각 요소는 우선순위를 가지고 있으며, 큐의 요소는 우선순위에 따라 정렬됩니다.
- 삽입 및 제거: 삽입 연산과 제거 연산은 모두 우선순위를 고려하여 수행됩니다.
- 응용 분야: 작업 스케줄링, 네트워크 트래픽 관리, 시뮬레이션 시스템 등에서 자주 사용됩니다.
구현 방법
우선순위 큐는 다양한 방법으로 구현할 수 있지만, 가장 효율적인 방법은 힙(heap) 자료구조를 사용하는 것입니다. 힙을 사용하면 삽입과 삭제 연산을 O(log n) 시간 복잡도로 수행할 수 있습니다.
배열을 사용한 간단한 구현
class PriorityQueue {
  constructor() {
    this.values = []
  }

  enqueue(value, priority) {
    this.values.push({ value, priority })
    this.sort()
  }

  dequeue() {
    return this.values.shift()
  }

  sort() {
    this.values.sort((a, b) => a.priority - b.priority) // 우선순위가 낮은 순서대로 정렬
  }
}

// 사용 예시
let pq = new PriorityQueue()
pq.enqueue('low priority task', 5)
pq.enqueue('medium priority task', 3)
pq.enqueue('high priority task', 1)

console.log(pq.values) // [{value: "high priority task", priority: 1}, {value: "medium priority task", priority: 3}, {value: "low priority task", priority: 5}]
console.log(pq.dequeue()) // {value: "high priority task", priority: 1}위의 구현은 배열을 사용하여 요소를 정렬합니다. 그러나 이 방식은 정렬하는 데 O(n log n)의 시간이 소요되므로, 더 효율적인 방법은 힙을 사용하는 것입니다.
힙을 사용한 우선순위 큐 구현 (자바스크립트 예제)
- 최소 힙을 바탕으로 구현된 우선순위 큐
- 기존 이진 힙을 구현할 때와의 차이점은 priority 를 바탕으로 값을 넣어준다는 점입니다
class Node {
  constructor(value, priority) {
    this.value = value
    this.priority = priority
  }
}

class PriorityQueue {
  // Write a Min Binary Heap = lower number means higher priority
  // Each Node has a value and a priority. Use the priority to build the heap
  // Enqueue method accepts a value and priority, makes a new node, and puts it in the right spot based off its prioirty
  // Dequeue method removes root element, returns it, and rearranges heap using priority

  constructor() {
    this.values = []
  }
  enqueue(val, priority) {
    let newNode = new Node(val, priority)
    this.values.push(newNode)
    this.bubbleUp()
  }
  bubbleUp() {
    let idx = this.values.length - 1
    const element = this.values[idx]
    while (idx > 0) {
      let parentIdx = Math.floor((idx - 1) / 2)
      let parent = this.values[parentIdx]
      if (element.priority >= parent.priority) break
      this.values[parentIdx] = element
      this.values[idx] = parent
      idx = parentIdx
    }
  }
  dequeue() {
    const min = this.values[0]
    const end = this.values.pop()
    if (this.values.length > 0) {
      this.values[0] = end
      this.sinkDown()
    }
    return min
  }
  sinkDown() {
    let idx = 0
    const length = this.values.length
    const element = this.values[0]
    while (true) {
      let leftChildIdx = 2 * idx + 1
      let rightChildIdx = 2 * idx + 2
      let leftChild, rightChild
      let swap = null

      if (leftChildIdx < length) {
        leftChild = this.values[leftChildIdx]
        if (leftChild.priority < element.priority) {
          swap = leftChildIdx
        }
      }
      if (rightChildIdx < length) {
        rightChild = this.values[rightChildIdx]
        if (
          (swap === null && rightChild.priority < element.priority) ||
          (swap !== null && rightChild.priority < leftChild.priority)
        ) {
          swap = rightChildIdx
        }
      }
      if (swap === null) break
      this.values[idx] = this.values[swap]
      this.values[swap] = element
      idx = swap
    }
  }
}

let ER = new PriorityQueue()

ER.enqueue('common cold', 5)
ER.enqueue('gunshot wound', 1)
ER.enqueue('high fever', 4)
ER.enqueue('broken arm', 2)
ER.enqueue('glass in foot', 3)

console.log('ER:', ER.dequeue())
console.log('ER:', ER.dequeue())
console.log('ER:', ER.dequeue())
console.log('ER:', ER.dequeue())
console.log('ER:', ER.dequeue())우선순위 큐의 응용
- 작업 스케줄링: 우선순위가 높은 작업을 먼저 처리해야 할 때 사용합니다.
- 다익스트라 알고리즘: 그래프에서 최단 경로를 찾는 알고리즘에 사용됩니다.
- 이벤트 관리 시스템: 이벤트를 우선순위에 따라 처리할 때 사용됩니다.
- 네트워크 트래픽 관리: 데이터 패킷의 우선순위를 정해 전송 순서를 결정할 때 사용됩니다.
우선순위 큐는 여러 가지 문제를 효율적으로 해결하는 데 유용한 자료 구조입니다. 특히, 힙을 사용하여 구현하면 삽입과 삭제 연산을 효율적으로 수행할 수 있어 다양한 응용 분야에서 활용됩니다.
Hash Table
해시 테이블(Hash Table)은 키(Key)와 값(Value)의 쌍을 저장하고, 빠르게 데이터를 검색, 삽입, 삭제할 수 있는 자료 구조입니다. 해시 테이블은 해시 함수를 사용하여 키를 해시 값으로 변환하고, 이를 인덱스로 사용해 배열에 값을 저장합니다.
해시 테이블의 특징
- 빠른 검색, 삽입, 삭제: 평균적으로 O(1)의 시간 복잡도로 검색, 삽입, 삭제 작업을 수행할 수 있습니다.
- 해시 함수(Hash Function): 키를 입력받아 고정된 크기의 해시 값(주로 정수)을 반환하는 함수입니다. 좋은 해시 함수는 키를 고르게 분포시키고 충돌을 최소화합니다.
- 충돌(Collision): 서로 다른 키가 동일한 해시 값을 갖는 상황을 충돌이라고 합니다. 충돌을 해결하는 방법으로 체이닝(Chaining)과 개방 주소법(Open Addressing)이 있습니다.
충돌 해결 방법
- 체이닝(Chaining): 각 배열 요소를 연결 리스트로 관리하여, 충돌이 발생하면 해당 인덱스의 리스트에 노드를 추가하는 방식입니다.
- 개방 주소법(Open Addressing): 충돌이 발생하면 다른 빈 슬롯을 찾아 데이터를 저장하는 방식입니다. 대표적인 방법으로 선형 탐사(Linear Probing), 제곱 탐사(Quadratic Probing), 이중 해싱(Double Hashing) 등이 있습니다.
자바스크립트로 해시 테이블 구현하기
간단한 해시 함수 구현
function hash(key, arrayLen) {
  let total = 0
  let WEIRD_PRIME = 31
  for (let i = 0; i < Math.min(key.length, 100); i++) {
    let char = key[i]
    let value = char.charCodeAt(0) - 96
    total = (total * WEIRD_PRIME + value) % arrayLen
  }
  return total
}체이닝을 이용한 해시 테이블 구현
class HashTable {
  // 소수 값을 기본 값으로 설정한다
  constructor(size = 53) {
    this.keyMap = new Array(size)
  }

  _hash(key) {
    let total = 0
    // 소수를 곱하면, 단어간의 충돌 횟수가 현저히 줄어들었음
    let WEIRD_PRIME = 31

    // 키 값의 길이가 100이 넘는다면, 100을 사용하여 루프를 돈다
    for (let i = 0; i < Math.min(key.length, 100); i++) {
      let char = key[i]
      let value = char.charCodeAt(0) - 96
      total = (total * WEIRD_PRIME + value) % this.keyMap.length
    }
    return total
  }

  set(key, value) {
    // Separate Chaining, Linear Probing 중 개별 체이닝 사용
    // Accepts a key and a value
    // Hashes the key
    // Stores the key-value pair in the hash table array via separate chaining
    let index = this._hash(key)

    if (!this.keyMap[index]) {
      this.keyMap[index] = []
    }
    this.keyMap[index].push([key, value])
  }

  get(key) {
    // Accepts a key
    // Hashes the key
    // Retrieves the key-value pair in the hash table
    let index = this._hash(key)
    if (this.keyMap[index]) {
      for (let i = 0; i < this.keyMap[index].length; i++) {
        if (this.keyMap[index][i][0] === key) {
          return this.keyMap[index][i]
        }
      }
    }
    return undefined
  }

  keys() {
    let results = []
    for (let key of this.keyMap) {
      if (key) {
        for (let [key, value] of key) {
          if (!results.includes(key)) results.push(key)
        }
      }
    }
    return results
  }

  values() {
    let results = []
    for (let key of this.keyMap) {
      if (key) {
        for (let [key, value] of key) {
          if (!results.includes(value)) results.push(value)
        }
      }
    }
    return results
  }
}

let newHashTable = new HashTable()

newHashTable.set('bowow', 'A')
newHashTable.set('cowow', 'B')
newHashTable.set('dowow', 'C')
newHashTable.set('Awwww', 'D')
newHashTable.set('Awwww', 'D')
newHashTable.set('Awwww', 'D')

newHashTable.get('Awwww')
console.log(newHashTable.keys())
console.log(newHashTable.values())

/**
 * newHashTable: HashTable {
  keyMap: [
    <19 empty items>,
    [ [Array] ],
    <3 empty items>,
    [ [Array], [Array] ],
    <3 empty items>,
    [ [Array] ],
    <25 empty items>
  ]
}
*/선형 탐사를 통한 구현
class HashTable {
  constructor(size = 53) {
    this.keyMap = new Array(size)
  }

  _hash(key) {
    let total = 0
    let WEIRD_PRIME = 31
    for (let i = 0; i < Math.min(key.length, 100); i++) {
      let char = key[i]
      let value = char.charCodeAt(0) - 96
      total = (total * WEIRD_PRIME + value) % this.keyMap.length
    }
    return total
  }

  set(key, value) {
    let index = this._hash(key)
    // 선형 탐사를 사용하여 빈 슬롯을 찾음
    while (this.keyMap[index] !== undefined && this.keyMap[index].key !== key) {
      index = (index + 1) % this.keyMap.length
    }
    this.keyMap[index] = { key, value }
  }

  get(key) {
    let index = this._hash(key)
    // 선형 탐사를 사용하여 키를 찾음
    while (this.keyMap[index] !== undefined) {
      if (this.keyMap[index].key === key) {
        return this.keyMap[index].value
      }
      index = (index + 1) % this.keyMap.length
    }
    return undefined
  }

  keys() {
    let keysArr = []
    for (let i = 0; i < this.keyMap.length; i++) {
      if (this.keyMap[i]) {
        keysArr.push(this.keyMap[i].key)
      }
    }
    return keysArr
  }

  values() {
    let valuesArr = []
    for (let i = 0; i < this.keyMap.length; i++) {
      if (this.keyMap[i]) {
        valuesArr.push(this.keyMap[i].value)
      }
    }
    return valuesArr
  }
}

// 사용 예시
let ht = new HashTable(17)
ht.set('maroon', '#800000')
ht.set('yellow', '#FFFF00')
ht.set('olive', '#808000')
ht.set('salmon', '#FA8072')
ht.set('lightcoral', '#F08080')
ht.set('mediumvioletred', '#C71585')
ht.set('plum', '#DDA0DD')

console.log(ht.get('yellow')) // #FFFF00
console.log(ht.keys()) // ["maroon", "yellow", "olive", "salmon", "lightcoral", "mediumvioletred", "plum"]
console.log(ht.values()) // ["#800000", "#FFFF00", "#808000", "#FA8072", "#F08080", "#C71585", "#DDA0DD"]해시 테이블의 장점
- 빠른 데이터 접근: 평균적으로 O(1) 시간 복잡도로 데이터 접근이 가능합니다.
- 간단한 구현: 비교적 간단하게 구현할 수 있으며, 대부분의 프로그래밍 언어에서 내장 자료 구조로 제공됩니다.
해시 테이블의 단점
- 충돌 처리: 충돌이 발생하면 성능이 저하될 수 있으며, 이를 해결하기 위한 추가적인 구조가 필요합니다.
- 공간 낭비: 해시 테이블의 크기를 적절하게 설정하지 않으면 메모리 낭비가 발생할 수 있습니다.
- 정렬되지 않은 데이터: 데이터가 특정 순서로 저장되지 않기 때문에 정렬된 데이터를 제공해야 하는 경우에는 적합하지 않습니다.
해시 테이블의 응용
- 캐싱: 데이터베이스 조회 결과 등을 캐싱하여 성능을 향상시킬 때 사용됩니다.
- 집합 연산: 집합의 포함 여부를 빠르게 확인할 수 있는 자료 구조로 사용됩니다.
- 연관 배열: 키와 값을 맵핑하는 연관 배열이나 사전을 구현하는 데 사용됩니다.
해시 테이블은 매우 강력하고 효율적인 자료 구조로, 많은 알고리즘과 시스템에서 필수적인 역할을 합니다.
Graph
그래프(Graph)는 정점(Vertex)과 간선(Edge)으로 이루어진 자료 구조로, 정점 간의 관계를 나타내는 데 사용됩니다. 그래프는 다양한 형태로 존재하며, 여러 가지 문제를 해결하는 데 유용합니다.
그래프의 기본 용어
- 정점(Vertex): 그래프의 노드를 의미합니다. 정점은 데이터를 저장할 수 있습니다.
- 간선(Edge): 정점 간의 연결을 나타냅니다. 간선은 방향이 있을 수도(유향 그래프) 없을 수도(무향 그래프) 있습니다.
- 인접 정점(Adjacent Vertex): 간선으로 직접 연결된 정점들입니다.
- 경로(Path): 한 정점에서 시작하여 다른 정점으로 가는 일련의 간선들입니다.
- 가중치(Weight): 간선에 부여된 값으로, 두 정점 간의 비용이나 거리를 나타냅니다. 가중치가 있는 그래프를 가중치 그래프(Weighted Graph)라고 합니다.
그래프의 종류
- 무향 그래프(Undirected Graph): 간선에 방향이 없는 그래프입니다.
- 유향 그래프(Directed Graph): 간선에 방향이 있는 그래프입니다.
- 가중치 그래프(Weighted Graph): 간선에 가중치가 있는 그래프입니다.
- 비가중치 그래프(Unweighted Graph): 간선에 가중치가 없는 그래프입니다.
그래프의 표현 방법
- 인접 행렬(Adjacency Matrix): 정점을 행과 열로 표현하고, 정점 간의 연결을 행렬의 값으로 나타냅니다. 연결되어 있으면 1, 연결되어 있지 않으면 0으로 표시합니다. 가중치가 있는 그래프에서는 가중치를 행렬의 값으로 표시합니다.
- 인접 리스트(Adjacency List): 각 정점에 대해 인접한 정점들의 리스트를 저장합니다. 인접 리스트는 공간 효율성이 좋고, 그래프의 정점과 간선이 많을 때 유리합니다.
1. 인접 행렬(Adjacency Matrix)

개념
인접 행렬은 정점을 행과 열로 표시하고, 두 정점 사이에 간선이 존재하면 해당 행렬 위치에 1(또는 가중치 값)을, 존재하지 않으면 0을 기록합니다.
시간 복잡도
- 공간 복잡도: (O(V^2)) - (V)는 정점의 수
- 간선 추가: (O(1))
- 간선 삭제: (O(1))
- 간선 존재 여부 확인: (O(1))
- 정점의 모든 인접 정점 탐색: (O(V))
장점
- 간선 존재 여부 확인이 빠름: 특정 두 정점 사이의 간선 존재 여부를 (O(1)) 시간에 확인할 수 있습니다.
- 간선 추가/삭제가 빠름: (O(1)) 시간에 간선을 추가하거나 삭제할 수 있습니다.
단점
- 공간 비효율성: 정점의 수가 많고 간선의 수가 적은 경우(희소 그래프) 많은 공간이 낭비됩니다.
- 정점의 인접 정점 탐색이 느림: 특정 정점의 모든 인접 정점을 찾으려면 행렬의 해당 행 전체를 확인해야 하므로 \(O(V)\) 시간이 걸립니다.
2. 인접 리스트(Adjacency List)


개념
인접 리스트는 각 정점에 대해 연결된 인접 정점의 리스트를 저장합니다. 배열이나 링크드 리스트를 사용해 구현할 수 있습니다.
시간 복잡도
- 공간 복잡도: (O(V + E)) - (E)는 간선의 수
- 간선 추가: (O(1))
- 간선 삭제: (O(E / V)) 평균적으로, 최악의 경우 (O(V))
- 간선 존재 여부 확인: (O(E / V)) 평균적으로, 최악의 경우 (O(V))
- 정점의 모든 인접 정점 탐색: (O(V)) 최악의 경우, 하지만 평균적으로 인접한 정점의 수에 비례
장점
- 공간 효율성: 희소 그래프의 경우 공간을 절약할 수 있습니다.
- 정점의 인접 정점 탐색이 빠름: 특정 정점의 모든 인접 정점을 빠르게 탐색할 수 있습니다. 평균적으로 인접한 정점의 수에 비례한 시간에 탐색이 가능합니다.
단점
- 간선 존재 여부 확인이 느림: 특정 두 정점 사이의 간선 존재 여부를 확인하려면 인접 리스트를 순회해야 하므로 최악의 경우 (O(V)) 시간이 걸립니다.
- 간선 삭제가 느림: 간선을 삭제하려면 인접 리스트에서 해당 간선을 찾아야 하므로 시간이 더 걸릴 수 있습니다.
선택 기준
- 그래프의 밀도: 그래프가 밀집되어 있고 간선의 수가 정점의 수의 제곱에 비례한다면 인접 행렬이 적합합니다. 반대로, 희소 그래프에서는 인접 리스트가 공간 효율성이 높습니다.
- 간선 존재 여부 확인: 두 정점 사이의 간선 존재 여부를 빈번하게 확인해야 한다면 인접 행렬이 더 효율적입니다.
- 정점의 인접 정점 탐색: 특정 정점의 모든 인접 정점을 자주 탐색해야 한다면 인접 리스트가 더 효율적입니다.
이러한 비교와 장단점을 고려하여, 그래프의 특성과 요구사항에 따라 적합한 표현 방법을 선택하는 것이 중요합니다.
시간 복잡도

인접 리스트를 사용한 구현
class Graph {
  constructor() {
    this.adjacencyList = {}
  }

  addVertex(vertex) {
    if (!this.adjacencyList[vertex]) this.adjacencyList[vertex] = []
  }

  addEdge(vertex1, vertex2) {
    if (!this.adjacencyList[vertex1]) this.addVertex(vertex1)
    if (!this.adjacencyList[vertex2]) this.addVertex(vertex2)

    this.adjacencyList[vertex1].push(vertex2)
    this.adjacencyList[vertex2].push(vertex1)
  }

  removeEdge(vertex1, vertex2) {
    this.adjacencyList[vertex1] = this.adjacencyList[vertex1].filter(
      (v) => v !== vertex2,
    )
    this.adjacencyList[vertex2] = this.adjacencyList[vertex2].filter(
      (v) => v !== vertex1,
    )
  }

  removeVertex(vertex) {
    for (let key in this.adjacencyList) {
      if (this.adjacencyList[key].includes(vertex)) {
        this.adjacencyList[key] = this.adjacencyList[key].filter(
          (v) => v !== vertex,
        )
      }
    }

    delete this.adjacencyList[vertex]

    console.log('after this.adjacencyList[key]:', this.adjacencyList)
  }
}

let basicGraph = new Graph()

basicGraph.addVertex('A')
basicGraph.addVertex('B')

basicGraph.addEdge('A', 'B')
basicGraph.addEdge('A', 'C')
basicGraph.addEdge('A', 'D')
basicGraph.addEdge('B', 'C')

basicGraph.removeVertex('A')

console.log(basicGraph)그래프 탐색 알고리즘
- 너비 우선 탐색(BFS, Breadth-First Search): 시작 정점에서 가까운 정점부터 탐색하는 알고리즘입니다. 주로 큐(Queue)를 사용하여 구현합니다.
- 깊이 우선 탐색(DFS, Depth-First Search): 시작 정점에서 한 방향으로 깊이 탐색하다가 더 이상 갈 수 없으면 다른 경로로 탐색하는 알고리즘입니다. 주로 스택(Stack)을 사용하여 구현하거나 재귀 호출로 구현합니다.
너비 우선 탐색(BFS) 구현
 bfs(vertex) {
    // This function should accept a starting vertex
    // Create a queue (you can use an array) and place the starting vertex in it
    // Create an array to store the node visited
    // Create an object to store nodes visited
    // Mark the starting vertex as visited
    // Loop as long as there is anything in the queue
    // Remove the first vertex from the queue and push it into the array stores nodes visited
    // Loop over each vertex in the adjacency list for the vertex you are visiting
    // If it is not inside the object that stores nodes visited, mark it as visited and enqueue that vertex

    let queue = [];
    let results = [];
    let visited = {};
    let targetVertex;

    queue.push(vertex);
    visited[vertex] = true;

    while (queue.length) {
      console.log('queue:', queue);
      targetVertex = queue.shift();
      results.push(targetVertex);

      this.adjacencyList[targetVertex].forEach((neighbor) => {
        if (!visited[neighbor]) {
          visited[neighbor] = true;
          queue.push(neighbor);
        }
      });
    }

    return results;
}깊이 우선 탐색(DFS) 구현 - 재귀
  dfRecursive(startVertex) {
    // The function should accept a starting node
    // Create a 'results' variable to store the end result, to be returned at the very end
    // Create an object 'visitied' to store visited vertices
    // Create a helper function which accepts a vertex
    // The helper function should return early if the vertex is empty
    // The helper function should place the vertex it accepts into the visited object and push that vertex into the result array
    // Loop over all of the values in the adjacencyList for that vertex
    // If any of those values have not been visited, recursively invoke the helper function with that vertext
    let results = [];
    let visited = {};
    let adjacencyList = this.adjacencyList;
    /**
     * { A : true, B: true, ... }
     */

    function helper(vertex) {
      if (!vertex) return null;
      visited[vertex] = true;
      results.push(vertex);

      adjacencyList[vertex].forEach((neighbor) => {
        if (!visited[neighbor]) {
          return helper(neighbor);
        }
      });
    }

    helper(startVertex);

    return results;
  }

  /**
const list = {
  A: ['B', 'C'],
  B: ['A', 'D'],
  C: ['A', 'E'],
  D: ['B', 'E', 'F'],
  E: ['C', 'D', 'F'],
  F: ['D', 'E'],
};
 */

/**
 * basicGraph.dfRecursive('A')
 *
 * [ 'A', 'B', 'D', 'E', 'C', 'F' ]
*/깊이 우선 탐색(DFS) 구현 - 순환
dfIterative(vertex) {
    // The function should accept a starting node
    // Create a stack to help use keep track of vertices (use a list/ array)
    // Create a list to store the end result, to be returned at the very end
    // Create an object to store visited vertices
    // Add the starting vertex to the stack, and mark it visited
    // While the stack has something in it:
    // Pop the next vertext from the stack
    // If that vertext hasn't been visited yet:
    // Mark it as visited
    // Add it to the result list
    // Push all of its neighbors into the stack

    let stack = [];
    let results = [];
    let visited = {};
    let targetVertex;

    stack.push(vertex);
    visited[vertex] = true;

    while (stack.length) {
      console.log('stack:', stack);
      targetVertex = stack.pop();
      results.push(targetVertex);

      this.adjacencyList[targetVertex].forEach((neighbor) => {
        if (!visited[neighbor]) {
          visited[neighbor] = true;
          stack.push(neighbor);
        }
      });
    }

    return results;
  }

  /**
const list = {
  A: ['B', 'C'],
  B: ['A', 'D'],
  C: ['A', 'E'],
  D: ['B', 'E', 'F'],
  E: ['C', 'D', 'F'],
  F: ['D', 'E'],
};
 */

/**
 *basicGraph.dfIterative('A')
 *
 *  stack: [ 'A' ]
 *  stack: [ 'B', 'C' ]
 *  stack: [ 'B', 'E' ]
 *  stack: [ 'B', 'D', 'F' ]
 *  stack: [ 'B', 'D' ]
 *  stack: [ 'B' ]
 *
 *  [ 'A', 'C', 'E', 'F', 'D', 'B' ]
*/그래프의 응용
- 네트워크: 컴퓨터 네트워크, 소셜 네트워크 등에서 노드 간의 연결을 나타내기 위해 사용됩니다.
- 경로 찾기: 지도나 길 찾기 애플리케이션에서 최단 경로를 찾기 위해 사용됩니다.
- 일정 관리: 프로젝트 관리에서 작업 간의 의존성을 나타내기 위해 사용됩니다.
- 순위 계산: 페이지 랭크 알고리즘과 같은 검색 엔진에서 페이지의 중요도를 계산하기 위해 사용됩니다.
그래프는 데이터 간의 관계를 나타내는 데 매우 유용한 자료 구조로, 다양한 분야에서 중요한 역할을 합니다.
Dijkstra
다익스트라 알고리즘(Dijkstra's Algorithm)은 그래프에서 한 정점에서 다른 모든 정점으로의 최단 경로를 찾는 데 사용되는 알고리즘입니다. 이 알고리즘은 가중치가 있는 그래프에서 사용되며, 가중치가 음수가 아닌 경우에만 적용할 수 있습니다.
다익스트라 알고리즘의 개념
- 시작 정점 선택: 알고리즘은 시작 정점에서 시작합니다.
- 최단 경로 집합: 최단 경로를 확정한 정점들의 집합을 유지합니다.
- 미확정 집합: 아직 최단 경로가 확정되지 않은 정점들의 집합을 유지합니다.
- 거리 배열: 시작 정점에서 각 정점까지의 현재까지 발견된 최단 거리를 저장합니다. 초기에는 시작 정점의 거리를 0으로 설정하고 나머지 정점의 거리를 무한대로 설정합니다.
- 이웃 정점 업데이트: 현재 정점에서 인접한 정점들로의 거리를 계산하고, 더 짧은 경로를 발견하면 거리를 업데이트합니다.
- 반복: 모든 정점의 최단 경로가 확정될 때까지 이 과정을 반복합니다.
다익스트라 알고리즘의 과정

- 시작 정점을 설정하고, 시작 정점의 거리를 0으로 설정합니다.
- 현재 정점에서 인접한 모든 정점의 거리를 업데이트합니다.
- 아직 방문하지 않은 정점 중 가장 거리가 짧은 정점을 선택하여, 그 정점으로 이동합니다.
- 이 과정을 모든 정점이 방문될 때까지 반복합니다.
다익트라 메서드의 의사코드
- 이 함수는 시작 정점과 끝 정점을 받아야 합니다.
- 객체(이를 distances라고 부르겠습니다)를 만들고 각 키를 인접 리스트의 모든 정점으로 설정하되, 시작 정점은 0의 값을 가지도록 하고 나머지는 무한대의 값을 가지도록 합니다.
- distances 객체에 값을 설정한 후, 시작 정점을 제외한 각 정점을 우선순위 큐에 무한대의 우선순위로 추가합니다. 시작 정점은 우리가 시작하는 곳이므로 우선순위가 0이어야 합니다.
- previous라는 또 다른 객체를 만들고 각 키를 인접 리스트의 모든 정점으로 설정하되, 값은 null로 설정합니다.
- 우선순위 큐에 항목이 있는 동안 반복을 시작합니다.
- 우선순위 큐에서 정점을 dequeue합니다.
- 해당 정점이 끝 정점과 같으면 - 완료입니다!
- 그렇지 않으면 해당 정점의 인접 리스트의 각 값을 반복합니다.
- 시작 정점에서 해당 정점까지의 거리를 계산합니다.
- 그 거리가 현재 distances 객체에 저장된 값보다 작으면
- distances 객체를 새로운 더 짧은 거리로 업데이트합니다.
- previous 객체에 해당 정점을 포함하도록 업데이트합니다.
- 시작 노드로부터의 총 거리로 정점을 큐에 enqueue합니다.
자바스크립트로 다익스트라 알고리즘 구현
class PriorityQueue {
  constructor() {
    this.values = []
  }
  enqueue(val, priority) {
    this.values.push({ val, priority })
    this.sort()
  }
  dequeue() {
    return this.values.shift()
  }
  sort() {
    this.values.sort((a, b) => a.priority - b.priority)
  }
}

class WeightedGraph {
  constructor() {
    this.adjacencyList = {}
  }
  addVertex(vertex) {
    if (!this.adjacencyList[vertex]) this.adjacencyList[vertex] = []
  }
  addEdge(vertex1, vertex2, weight) {
    this.adjacencyList[vertex1].push({ node: vertex2, weight })
    this.adjacencyList[vertex2].push({ node: vertex1, weight })
  }
  Dijkstra(start, finish) {
    // nodes dequeue 할 때, 가중치가 낮은 것을 먼저 뽑아 순회하기 위한 우선순위 큐 클래스
    const nodes = new PriorityQueue()
    // distances - 시작 정점을 기준으로 가장 짧은 거리를 저장해두는 객체
    const distances = {}
    // previous - 최종적으로 최단거리를 기억할 수 있는 객체
    const previous = {}
    // target - 우리가 실제로 방문하는 노드
    let target
    // path - 최단 거리를 저장해서 반환할 배열
    let path = []

    //build up initial state
    for (let vertex in this.adjacencyList) {
      if (vertex === start) {
        distances[vertex] = 0
        nodes.enqueue(vertex, 0)
      } else {
        distances[vertex] = Infinity
        nodes.enqueue(vertex, Infinity)
      }
      previous[vertex] = null
    }

    console.log('nodes.values:', nodes.values)
    console.log('distances:', distances)
    console.log('previous:', previous)
    console.log('adjacencyList:', this.adjacencyList)
    // as long as there is something to visit
    while (nodes.values.length) {
      target = nodes.dequeue().val
      if (target === finish) {
        //WE ARE DONE
        //BUILD UP PATH TO RETURN AT END
        while (previous[target]) {
          path.push(target)
          target = previous[target]
        }
        break
      }
      if (target || distances[target] !== Infinity) {
        for (let neighbor in this.adjacencyList[target]) {
          //find neighboring node
          let nextNode = this.adjacencyList[target][neighbor]
          //calculate new distance to neighboring node
          let newDistance = distances[target] + nextNode.weight

          console.log('nextNode:', nextNode)
          console.log('newDistance:', newDistance)

          if (newDistance < distances[nextNode.node]) {
            //updating new target distance to neighbor
            distances[nextNode.node] = newDistance
            //updating previous - How we got to neighbor
            previous[nextNode.node] = target
            //enqueue in priority queue with new priority
            nodes.enqueue(nextNode.node, newDistance)
          }
        }
      }
    }
    return path.concat(target).reverse()
  }
}

var graph = new WeightedGraph()
graph.addVertex('A')
graph.addVertex('B')
graph.addVertex('C')
graph.addVertex('D')
graph.addVertex('E')
graph.addVertex('F')

graph.addEdge('A', 'B', 4)
graph.addEdge('A', 'C', 2)
graph.addEdge('B', 'E', 3)
graph.addEdge('C', 'D', 2)
graph.addEdge('C', 'F', 4)
graph.addEdge('D', 'E', 3)
graph.addEdge('D', 'F', 1)
graph.addEdge('E', 'F', 1)

console.log(graph.Dijkstra('A', 'E'))

// ["A", "C", "D", "F", "E"]다익스트라 알고리즘의 시간 복잡도
- 우선순위 큐를 사용하지 않은 경우: (O(V^2))
- 우선순위 큐를 사용한 경우 (예: 힙 사용):
- 삽입/삭제: (O(log V))
- 총 시간 복잡도: (O((V + E) log V))
다익스트라 알고리즘의 특징
- 단일 시작점: 시작 정점에서 다른 모든 정점으로의 최단 경로를 구합니다.
- 비음수 가중치: 간선의 가중치가 음수인 경우에는 사용할 수 없습니다.
- 효율성: 우선순위 큐(힙)를 사용하면 큰 그래프에서도 비교적 효율적으로 작동합니다.
다익스트라 알고리즘은 네트워크 라우팅, 지도 서비스, 교통 시스템 등 다양한 분야에서 널리 사용됩니다.
Dynamic Programming
동적 프로그래밍(Dynamic Programming, DP)은 복잡한 문제를 더 작은 하위 문제로 나누어 해결하는 알고리즘 설계 기법입니다. 이 기법은 하위 문제의 해를 재사용하여 전체 문제의 해를 구하는 데 사용됩니다. 동적 프로그래밍은 주로 최적화 문제를 해결하는 데 사용되며, 두 가지 중요한 속성을 가집니다: **최적 부분 구조(Optimal Substructure)**와 중복 부분 문제(Overlapping Subproblems).
동적 프로그래밍의 개념
- 최적 부분 구조(Optimal Substructure):
- 큰 문제의 최적 해가 그 부분 문제의 최적 해로부터 유도될 수 있는 속성을 의미합니다.
- 예를 들어, 최단 경로 문제에서 전체 경로의 최적 해는 그 경로를 구성하는 부분 경로들의 최적 해로 구성될 수 있습니다.
- 중복 부분 문제(Overlapping Subproblems):
- 동일한 부분 문제가 여러 번 반복하여 계산되는 속성을 의미합니다.
- 동적 프로그래밍은 이러한 중복 계산을 피하기 위해 이미 계산된 값을 저장하고 재사용합니다.
동적 프로그래밍의 접근 방식
- 탑다운(메모이제이션, Memoization):
- 재귀적 접근 방식으로, 문제를 재귀적으로 나누고, 각 하위 문제의 결과를 저장하여 필요할 때 다시 사용합니다.
- 필요할 때 계산하므로, 처음에는 계산하지 않고 요청 시 계산하여 캐시에 저장합니다.
- 바텀업(테이블링, Tabulation):
- 반복적 접근 방식으로, 작은 하위 문제부터 차례로 해결하면서 상위 문제를 해결합니다.
- 모든 하위 문제를 미리 계산하여 테이블에 저장하고, 이를 사용해 상위 문제를 해결합니다.
동적 프로그래밍 예제
피보나치 수열
피보나치 수열은 동적 프로그래밍의 대표적인 예입니다. 피보나치 수 \(F(n)\)은 다음과 같이 정의됩니다:
피보나치 수열을 최적화 없이 사용할 경우 시간 복잡도는 O(2^n) 입니다.

function fib(n) {
  if (n <= 2) return 1

  return fib(n - 1) + fib(n - 2)
}

console.log(fib(2)) // 13메모이제이션을 사용한 피보나치 수열 (탑다운 방식)
function fib_memo(n, memo = []) {
  if (memo[n] !== undefined) return memo[n]
  if (n <= 2) return 1

  const res = fib(n - 1, memo) + fib(n - 2, memo)
  memo[n] = res

  console.log('memo:', memo)

  return res
}

console.log(fib_memo(10))

/**
 * memo: [ <3 empty items>, 2 ]
 * memo: [ <3 empty items>, 2, 3 ]
 * memo: [ <3 empty items>, 2, 3, 5 ]
 * memo: [ <3 empty items>, 2, 3, 5, 8 ]
 * memo: [ <3 empty items>, 2, 3, 5, 8, 13 ]
 * memo: [ <3 empty items>, 2, 3, 5, 8, 13, 21 ]
 * memo: [ <3 empty items>, 2, 3, 5, 8, 13, 21, 34 ]
 * memo: [ <3 empty items>, 2, 3, 5, 8, 13, 21, 34, 55 ]
55
*/테이블링을 사용한 피보나치 수열 (바텀업 방식)
function fib_tabulation(n) {
  if (n <= 2) return 1
  let fibNums = [0, 1, 1]
  for (let i = 3; i <= n; i++) {
    fibNums[i] = fibNums[i - 1] + fibNums[i - 2]
  }

  console.log('fibNums:', fibNums)

  return fibNums[n]
}

console.log(fib_tabulation(10))

/**
 * fibNums: [
   0, 1,  1,  2,  3,
   5, 8, 13, 21, 34,
  55
]
*/동적 프로그래밍의 특징
- 시간 복잡도 개선: 중복 계산을 피하고, 각 하위 문제를 한 번만 계산하므로 시간 복잡도가 크게 개선됩니다.
- 공간 복잡도: 메모이제이션이나 테이블을 저장하는 데 필요한 추가 공간이 필요하지만, 시간 복잡도 개선에 비해 큰 이점이 있습니다.
- 적용 범위: 최적화 문제, 경로 찾기 문제, 부분 집합 문제 등 다양한 문제에 적용할 수 있습니다.